There are several ways to connect Azure Subscriptions. Before, we were using VPN gateway for connecting different subscriptions Virtual Network to Virtual Network. We can use VNet Peering to connect virtual networks in the same Azure region or different Azure regions. The virtual networks can be in the same Azure subscription or in different subscriptions, as long as they share the same Azure AD tenant. Also now, we can use VNet Peering to connect different Azure AD Tenants. VNet Peering also allows you to connect two virtual networks created by using different deployment models. In this article, I'm going to explain how can we implement VNet Peering across different Azure Active Directory Tenants.
Before we start this article, what exactly we need to implement for this feature. We can configure VNet Peering by using the Azure portal, Azure PowerShell, Azure CLI and also Azure Resource Manager templates.
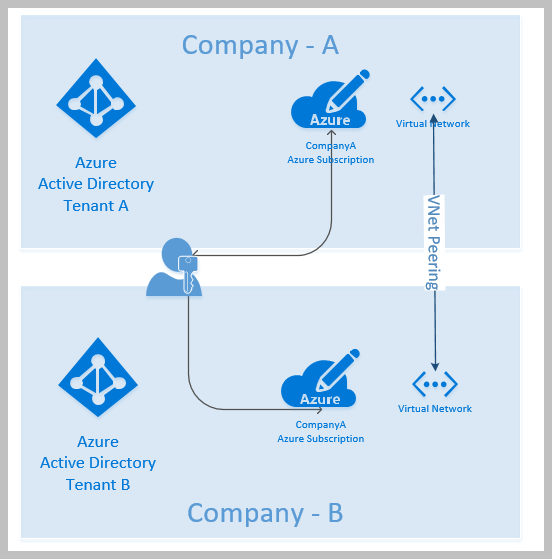
As you can see the above picture, need requirements which will be used for VNet Peering to connect Azure subscriptions.
Contents of this article;
- Clarify VNet to VNet Peering
- Creating and Configure VNet in the CompanyA with Powershell
- Creating and Configure VNet in the CompanyB with Powershell
- Configuring VNet Peering for each Virtual Network.
- Conclusion
Clarify VNet to VNet Peering
As we mentioned before, If you want to use VNet peering for your project or production environments, you can find below requirements which should have for each user.
- At least one user who has got access on all subscription.
- If you want to use multiple users for each subscription, each user should have to reach all subscriptions
- Users should verify to access each subscription on the different Azure AD Tenants.
- Take notes subscriptions.
In this article, I'm going to use just one user which has got permission for each subscription. On the best practices case, you should use specific users which have got permission for each subscription. Note that, in this article, we use the AZ Powershell Module which is new.
Creating and Configure VNet in the Company-A with Powershell
Now I have one user and it has permission for each subscription which placed different tenants. We are going to build new infrastructure resources because I want to show you step by step how can we manage this action. In this example, we have two companies. We call them Company-A and Company-B. The first Step is needed to login Powershell with the accessed user. Thereafter, We will create new resources, Virtual Network. We will do these actions each subscription. Because As I said before, we will be created new infrastructure resources.
Connect to Azure Connect-AzAccount
Create Resource Group for Company-A
New-AzResourceGroup -Name "RG-Company-A" -Location "West Europe" -Tag @{Company="A"}

# Create Virtual Network for Company-B

New-AzVirtualNetwork -Name "companyA-VNET" `
                     -ResourceGroupName "RG-Company-A" `
                     -AddressPrefix "192.168.10.0/24" `
                     -Location 'West Europe' -Tag @{Company="A"}
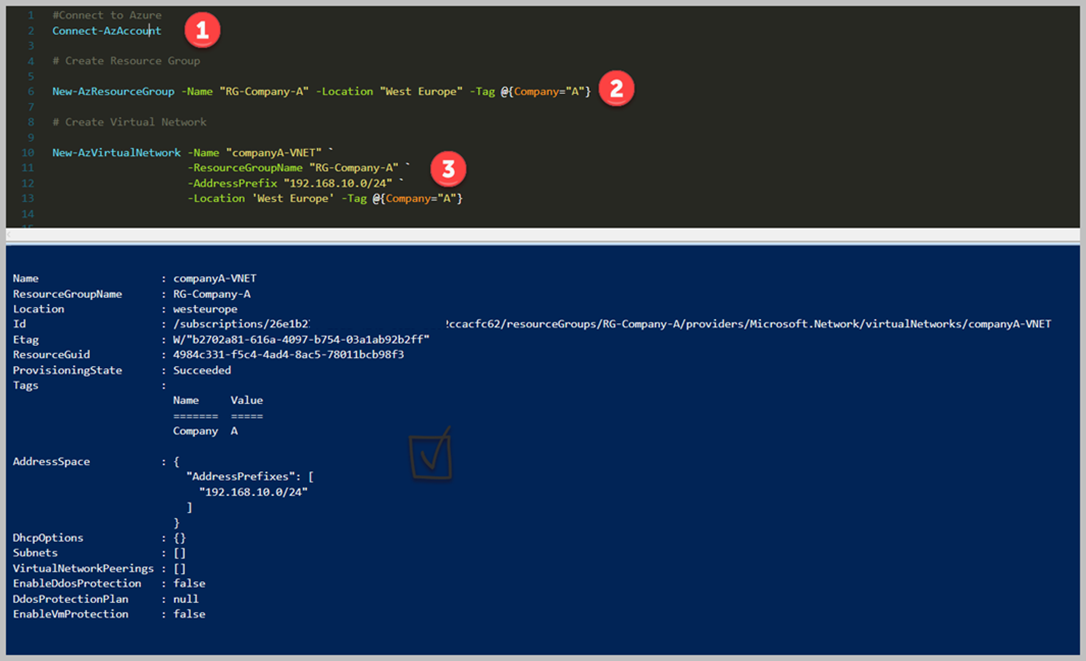
As you can see the results say us, we have executed our command lets for creating Resource Group, Virtual Network. We did all the steps into the Company-A Subscription.
Creating and Configure VNet in the Company-B with Powershell
Now we can log in to "Company-B Subscription". We are creating same resources which are Resource Group and Virtual Network. Afterwards, now we are ready to peer two different Virtual Network.
# Create Resource Group for Company-A

New-AzResourceGroup -Name "RG-Company-B" -Location "West Europe" -Tag @{Company="B"}

# Create Virtual Network for Company-B

New-AzVirtualNetwork -Name "companyA-VNET" `
                     -ResourceGroupName "RG-Company-B" `
                     -AddressPrefix "10.10.10.0/24" `
                     -Location 'West Europe' -Tag @{Company="B"}
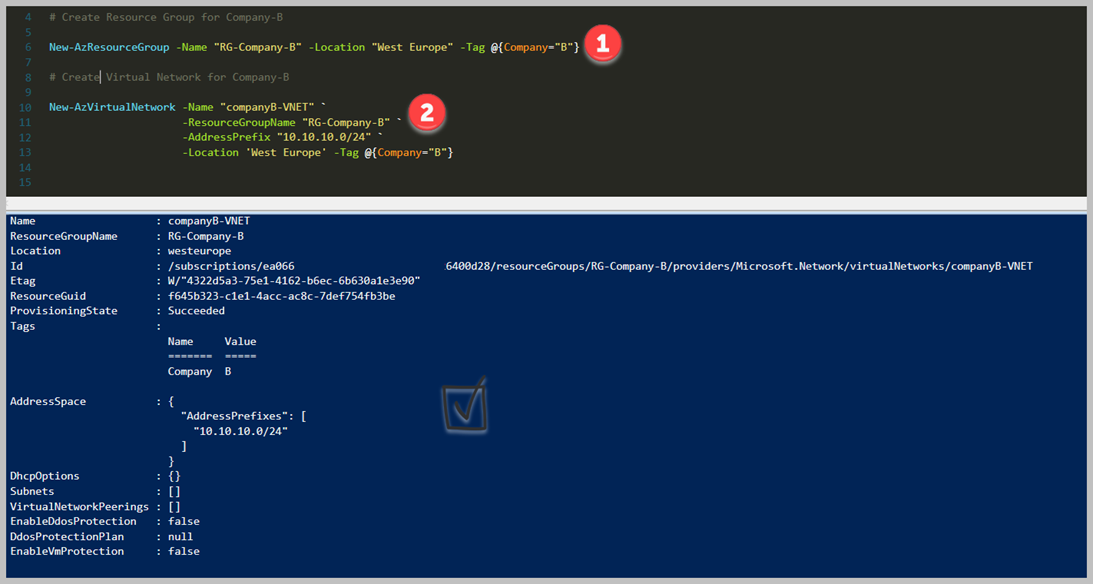
As you can see clearly, we have created Resource Group and Virtual Network on each subscription. Now can skip configuring VNet to VNet Peering steps. I think that it is the easiest way to implement Azure subscriptions which placed on different Azure Active Directory Tenant.
Configuring VNet Peering for each Virtual Network.
We are going to use two command-lets which are "Get-AzureRmVirtualNetwork" and "Add-AzureRmVirtualNetworkPeering". Also As we said before, we have to take a note each subscription Id. Because We will use them into the Powershell Command-Lets.
# Peer company-A-VirtualNetwork to company-B-VirtualNetwork
# Select Company-A Subscription - Select-AZSubscription.

$vNetA = Get-AZVirtualNetwork -Name companyB-VNET -ResourceGroupName RG-Company-B

Add-AZVirtualNetworkPeering \`
  -Name 'companyA-VNET' \`
  -VirtualNetwork $vNetA \`
  -RemoteVirtualNetworkId "/subscriptions/26e1b27f-\*\*\*\*\*\*\*\*8829-cacfc62/resourceGroups/RG-Company-A/providers/Microsoft.Network/virtualNetworks/companyA-VNET"
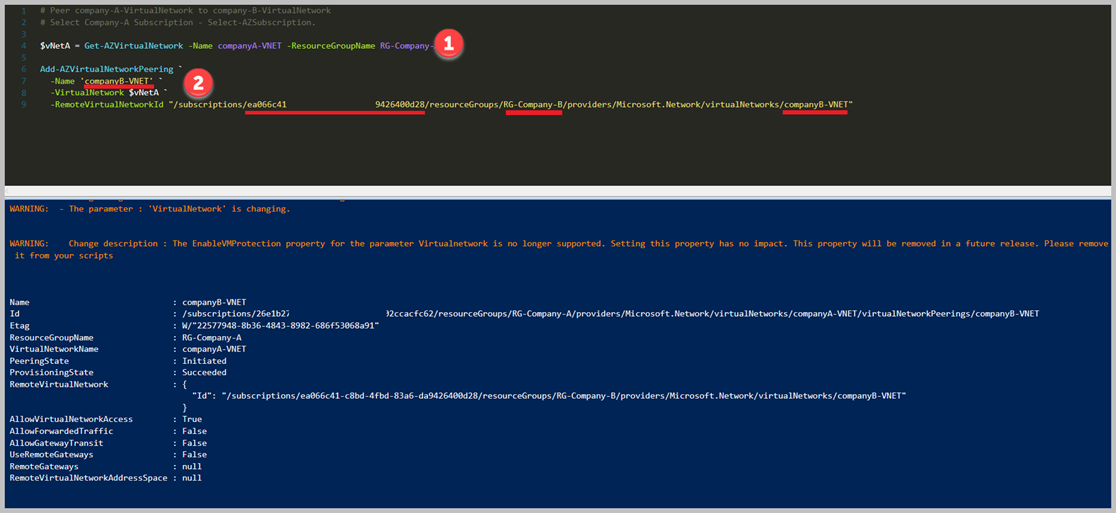
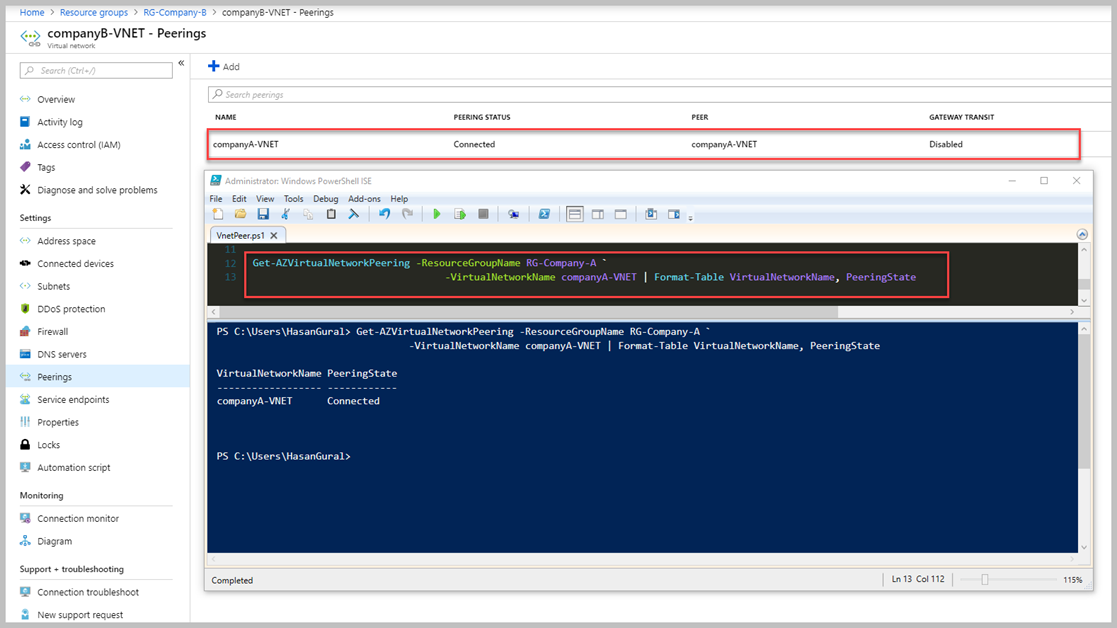
In the script lines, I did mention red lines which should be referred to Resource Group, Virtual Network, and SubscriptionId. We should use the above script for Company-A side. You have to execute the same scripts for the company-B site before you should be sure using "Company-B". If you used to the same script for the Company-B side now we can test peering connections status. Also, you can see the above picture, "PeeringState" column which explains to us peering status.
Conclusion
End of the article, we are going to test what is connection status for VNet Peering. There are two ways to control status VNet Peering. As you may know, the first one is Azure Portal also we can check with Powershell Command Lets. We used to Powershell Scripts for VNet Peering because Azure Portal does not support this implementation. You can see the below picture two ways.