As you know, We learned Azure Stack Identity and authentication ways before on this blog. At the present time, I thought we should have to learn Azure Stack Multi-Tenancy structure. Before we start, we should be understanding "Why we need Azure Stack Multi-Tenancy Infrastructure".
Basically, If you want to give service to your customers, you have to configure Multi-Tenancy in Azure Stack. This authentication is an imperative requirement when Azure Stack does not use AD FS and the customers of Azure Stack are from a different Azure AD from the one used for Azure Stack administration.
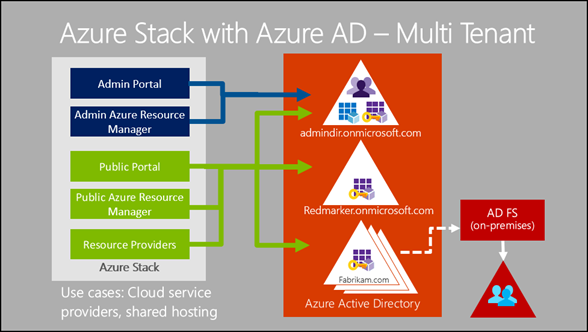
As a matter of fact, If you choose to use Active Directory FS-based identity and authentication, then you can not activate multi-tenancy in Azure Stack. As you know, When you installed Azure Stack on your Infrastructure, you can see an Active Directory Domain Services for Azure Stack Infrastructure but it is not sufficient for your customers. Thus Azure Stack will be able to use either Azure AD or AD FS for identity and authentication of cloud operators, cloud administrators, and DevOps.
When using Azure Stack with Azure Active Directory for identity and authentication of cloud operators, cloud administrators, and DevOps, you can enable Azure Stack to authenticate cloud administrators and DevOps from Azure AD instances that are different to the instance used by the cloud operator.
Important Note: If you still deployed and customized Azure Stack on your Infrastructure, you should have to use one of the two identity providers, Azure AD or AD FS, you cannot change the identity provider!
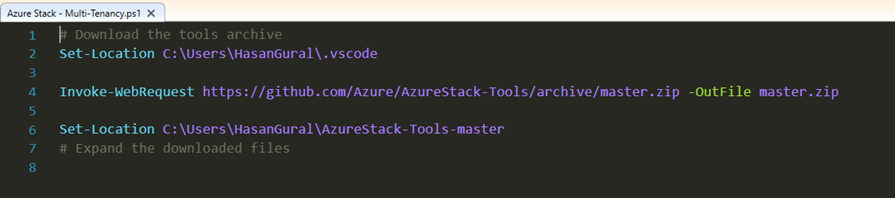
After you have decided to use Multi-Tenant Infrastructure, you ought to use Azure Stack Tools for executing the command line.
You can find - Azure Stack Tools
# Download the tools archive Set-Location C:\Users\HasanGural\.vscode
Invoke-WebRequest https://github.com/Azure/AzureStack-Tools/archive/master.zip -OutFile master.zip
Set-Location C:\Users\HasanGural\AzureStack-Tools-master
Expand the downloaded files
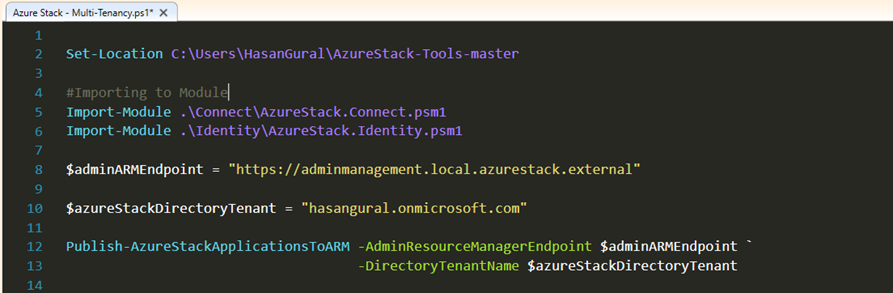
After you have downloaded and extracted the tools, you must configure the Azure Resource Manager instance in Azure Stack to publish the Azure AD applications
Set-Location C:\Users\HasanGural\AzureStack-Tools-master
#Importing to Module Import-Module .\Connect\AzureStack.Connect.psm1 Import-Module .\Identity\AzureStack.Identity.psm1
$adminARMEndpoint = "https://adminmanagement.local.azurestack.external"
$azureStackDirectoryTenant = "hasangural.onmicrosoft.com"
Publish-AzureStackApplicationsToARM -AdminResourceManagerEndpoint $adminARMEndpoint ` -DirectoryTenantName $azureStackDirectoryTenant
Within the System Resource Group, in the Default Provider Subscription, there are a lots of new application registrations was been created.
- AzureBridge.Azure Bridge
- AzurePackConnector.Azure Pack Connector
- CRP.AzureStack Compute Provider
- Deployment.Deployment Application
- KeyVault.AzureStack KeyVault
- Monitoring.AzureStack Monitoring Service
- Policy.AzureStack Policy Service
- Portal.Microsoft Azure Stack
- ResourceManager.Azure Stack
After you have been executed that script lines, Now Azure Stack is ready to be used in a multi-tenancy capacity.