
Without slowing down, we can continue to the 4th part of our Azure Virtual Network Manager series. So far, we have covered the following topics:
- Understanding of the Azure Virtual Network Manager Part 1
- Defining the scope of the Azure Virtual Network Manager Part 2
- Provisioning the Azure Virtual Network Manager Part 2
- Spining up Virtual Networks and Subnets for Lab Environment Part 3
- Create and configure Network Groups for Lab Environment Part 3
If you haven't read the previous parts, I recommend you to reading them before continuing this article. I want to focus on deploying basic Configurations on the Azure Virtual Network Manager in this article. Basically, Configurations are the set of rules that are applied to the Network Groups. However, there are two types of Configurations in AVNM. They are:
- Connectivity Configuration
- Security Configuration
Let's dive into types of Configurations in detail.
Connectivity Configuration
The Connectivity Configuration is having two type of topology options.
Hub and Spoke Topology: This type will create peerings between your Hub and the virtual networks in network groups. That topology is very common in enterprise environments. We have seen and managed the connectivity between the virtual networks with the help of the virtual hub network in enterprise environments. The benefit of choosing this type of topology is having no need to create any peering between the virtual networks. AVNM will take care of creating peering between the virtual networks.
Mesh Network : When we create a mesh topology, a new concept will be introduced via the AVNM. It is called Connected Group. Virtual networks which are in the same Network Group will not peer with each other, and you won't see any peering listed in the virtual network blade. But, you will observe that the virtual networks are able to communicate with each other. This is the magic of the AVNM. AVNM will introduce new routes underhood to the virtual networks. So, virtual networks will be able to communicate with each other. When you check the effective routes of the virtual networks, you will realize that new routes are added, and the next hop is the Connected Group.
Alright, let's start to create first Connectivity Configuration.
Create Connectivity Configuration
In order to create a Connectivity Configuration, we have to retrive the Network Group Ids. We can get the Network Group Ids with the help of the following command.
# Retrieve the network group Id from the network group name - networkGroup-01

$NetWorkGroupId = Get-AzNetworkManagerGroup -Name "networkGroup-01" -NetworkManagerName avnm -ResourceGroupName TailspinToys-AVNM
After retrieving the Network Group Id, we can create a Network Group Item. Network Group Item is the object which will be used to create the Connectivity Configuration.
# Create a network group item
$NetworkGroupItem = @{

    NetworkGroupId = $NetWorkGroupId.Id
}

$getGroupItem = New-AzNetworkManagerConnectivityGroupItem @networkGroupItem
Last step is creating the Connectivity Configuration. We have to specify the Connectivity Topology and the Network Group Item.
# Create a connectivity configuration
$groupConfig = @()

# Add the network group item to the connectivity configuration
$groupConfig += $getGroupItem

# Create the connectivity configuration
$config = @{

    Name                  = 'Mesh-ConnectivityConfig-01'
    ResourceGroupName     = $rgDef.Name
    NetworkManagerName    = $networkManager.Name
    ConnectivityTopology  = 'Mesh'
    AppliesToGroup        = $groupConfig

}

$MeshConnectivityConfig = New-AzNetworkManagerConnectivityConfiguration @config
Ace! We have now created the connectivity configuration. As you can see PS Object above, I have assigned single network group to the connectivity configuration. So, the virtual networks which are in the same network group will be affected by the connectivity configuration. Remember, the Connectivity topology is Mesh. So, the virtual networks which are in the same network group will be able to communicate with each other via Connected Group capability.You won't see any peering between the virtual networks still they will be able to communicate with each other. Let me show you the configuration in the Azure Portal.
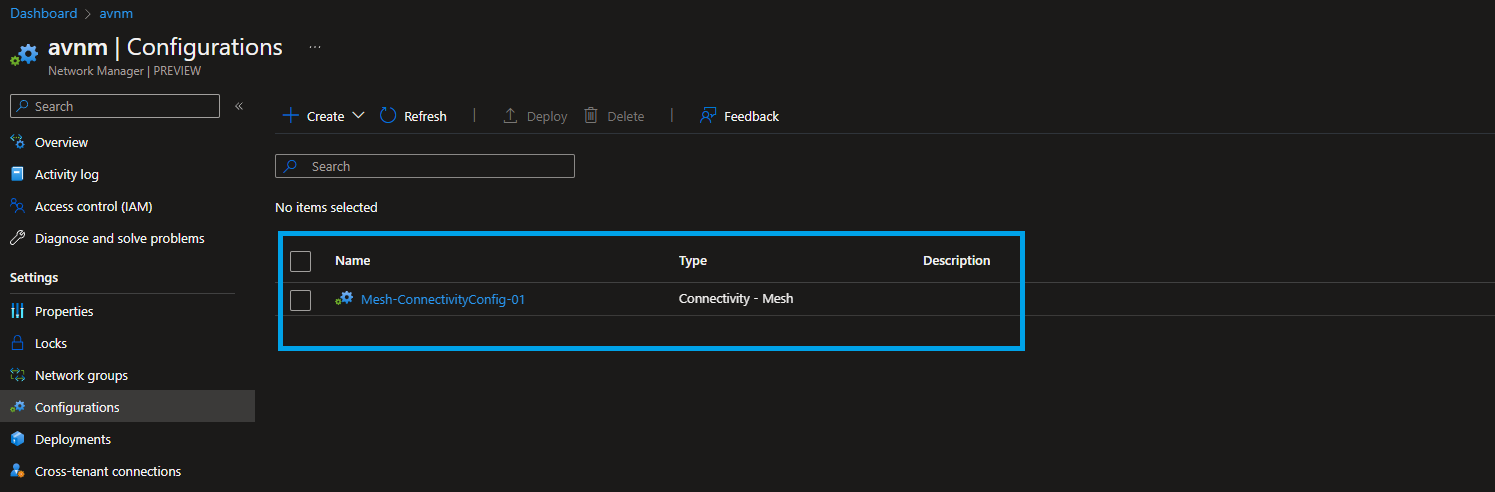
Once you click on the Connectivity Configuration, you will see the following screen and get more details about the configuration.
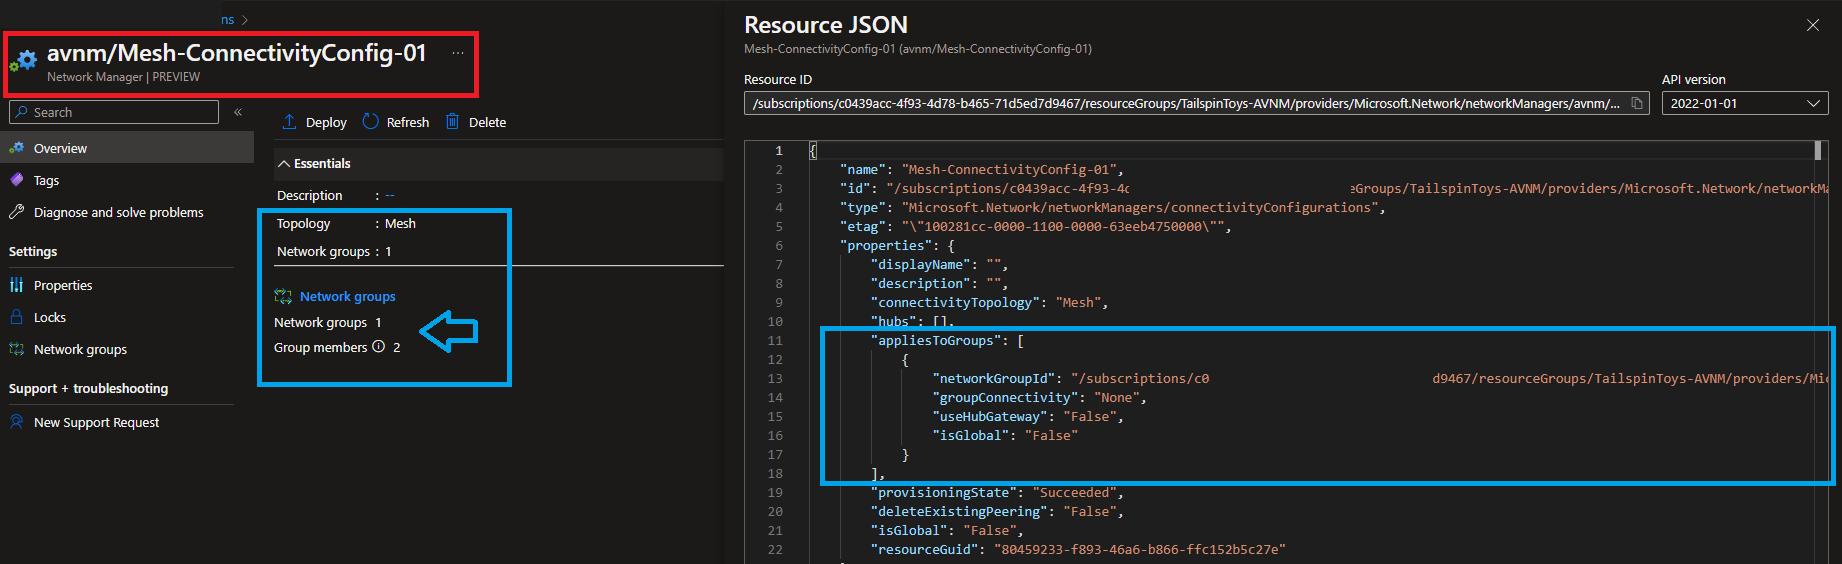
Configuration is ready to be applied. When we have create the configratuion, it is in the Draft state. We have to apply the configuration to the network groups. There is a concept of committing the configuration. When you commit the configuration, it will be triggered to the network groups. So, the network groups will be affected by the configuration.
PowerShell Cmdlet to commit the configuration is Deploy-AzNetworkManagerCommit. We have to specifiy parameters below to commit the configuration.
- Name: Name of the Network Manager
- ResourceGroupName: Resource Group Name
- ConfigurationId: Id of the Connectivity Configuration
- CommitType: Type of the commit. For our case, it will be Connectivity
- TargetLocation : Effected location of the Azure Regions for the configuration. For our case, it will be UK South
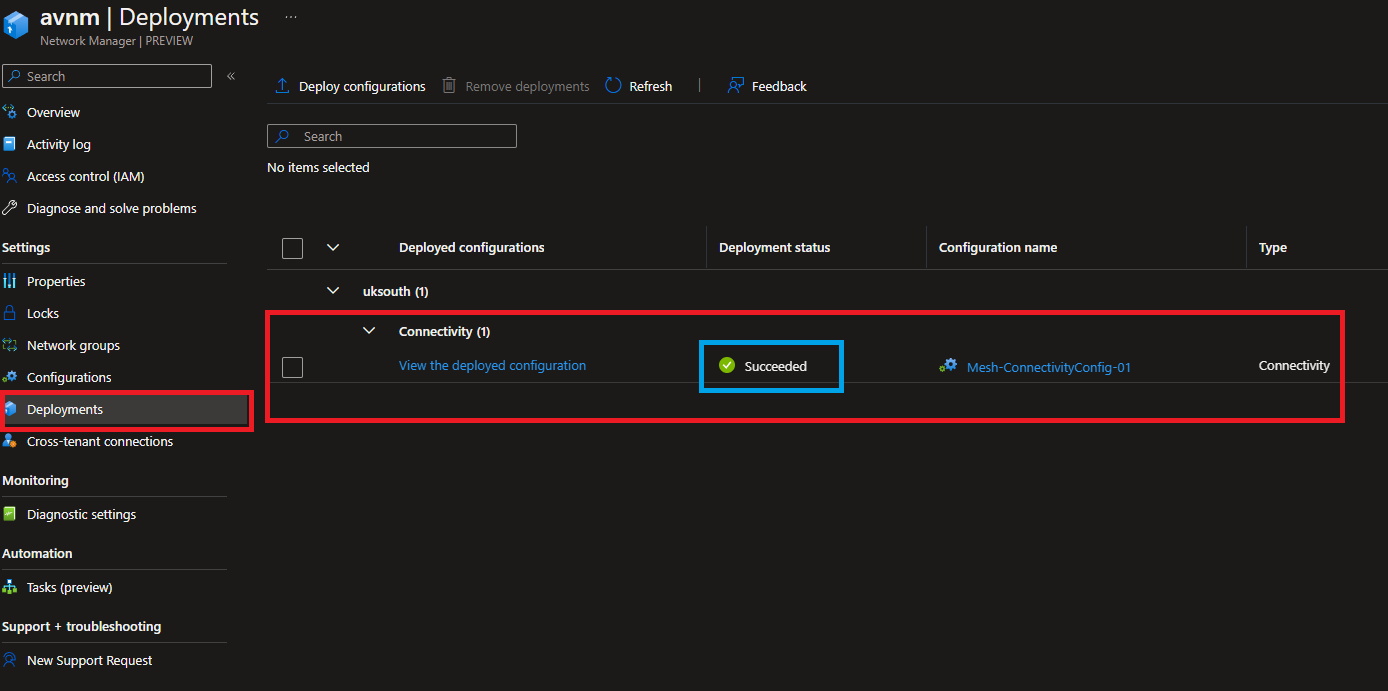
In Azure Virtual Network Manager blade, you can see the deployment status of the configuration.
# Gather the confguration Ids
$meshConfigIds = @()
$meshConfigIds += $MeshConnectivityConfig.Id

# Gather the effected regions
$meshEffectedRegions = @()
$meshEffectedRegions += "uksouth"

# Build the deployment object
$avnmDeployment = @{

    Name              = $networkManager.Name
    ResourceGroupName = $rgDef.Name
    ConfigurationId   = $meshConfigIds
    TargetLocation    = $meshEffectedRegions
    CommitType        = 'Connectivity'

}

# Deploy the configuration
Deploy-AzNetworkManagerCommit @avnmDeployment
Finally, we got the point where we can see deployment status of the configuration. You can validate the deployment status in the Azure Portal. See the screenshot below.
Deploying Vanilla VMs for Lab
Now we have end-to-end connectivity between the virtual networks which are in the same network group using the Connected Group ability. To prove this, I have to spin up temporary VMs in the virtual networks so that I can show you the connectivity between the virtual networks. I have created a PowerShell script to spin up the VMs - see below.
$virtualMachinesMap = @{

    "ubuntu-a" = @{

        "ResourceGroupName" = $rgDef.Name
        "Location"          = "uksouth"
        "Size"              = "Standard_B1s"
        "Image"             = "Canonical:UbuntuServer:18.04-LTS:latest"
        "vNetName"          = "vnet-a"
        "SubnetName"        = "subnet-a"
        "UserName"          = "admin-a"
        "Password"          = "-PASSWORD-HERE!"

    }
    "ubuntu-b" = @{

        "resourceGroupName" = $rgDef.Name
        "Location"          = "uksouth"
        "Size"              = "Standard_B1s"
        "Image"             = "Canonical:UbuntuServer:18.04-LTS:latest"
        "vNetName"          = "vnet-b"
        "SubnetName"        = "subnet-b"
        "UserName"          = "admin-b"
        "Password"          = "-PASSWORD-HERE!"
    }

}

ForEach ($vm in $virtualMachinesMap.Keys) {

    $properties = @{

        Name               = $vm
        ResourceGroupName  = $virtualMachinesMap.$vm.ResourceGroupName
        Location           = $virtualMachinesMap.$vm.Location
        VirtualNetworkName = $virtualMachinesMap.$vm.vNetName
        SubnetName         = $virtualMachinesMap.$vm.SubnetName
        Size               = $virtualMachinesMap.$vm.Size
        Image              = $virtualMachinesMap.$vm.Image
        SecurityGroupName  = $vm
        OpenPorts          = @("22")
        Credential         = New-Object System.Management.Automation.PSCredential($virtualMachinesMap.$vm.UserName, (ConvertTo-SecureString -String $virtualMachinesMap.$vm.Password -AsPlainText -Force))

    }

    New-AzVm @properties -AsJob
}
Execute the script and wait until the VMs are up and running. Once the VMs are up and running, we can go ahead Azure Portal and see the Effective Routes in Network Interfaces. Effective routes show us the routes which are applied to the VMs as indirect or direct routes.
Just wanted to remind you the Address Space of the virtual networks.
- vnet-a: "10.0.0.0/24"
- vnet-b: "10.0.1.0/24"
The screenshot below shows that there is no direct virtual network peering between "vnet-a" and "vnet-b". But, the VMs in the "vnet-a" can reach the VMs in the "vnet-b" using the Connected Group capability.
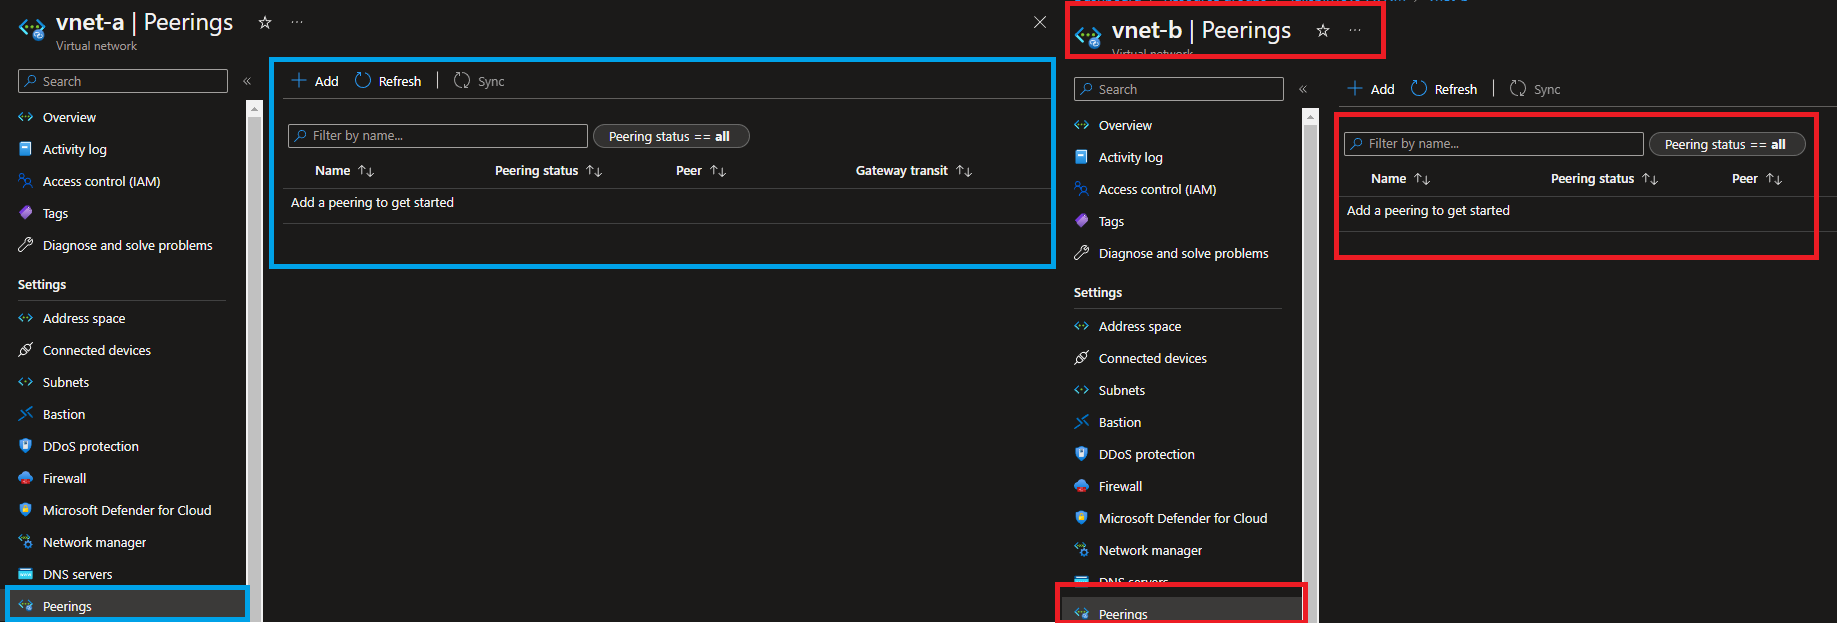
Effective Routes in Network Interfaces
There are multiple ways to see the effective routes in the Network Interfaces. I will use the PowerShell script below to show you the effective routes in the Network Interfaces and also show you the routes from the Azure Portal.
Here is the way of seeing the effective routes in the Network Interfaces using PowerShell. Please don't forget to replace the VM names with your VM names.
# This will help us to get effective routes for ubuntu-a
Get-AzEffectiveRouteTable -ResourceGroupName TailspinToys-AVNM -NetworkInterfaceName ubuntu-a | Format-Table -AutoSize

# Vice versa
Get-AzEffectiveRouteTable -ResourceGroupName TailspinToys-AVNM -NetworkInterfaceName ubuntu-b | Format-Table -AutoSize
Most likey will see the following output. If you're not seeing the output, please wait for a while. It takes some time to get the effective routes.
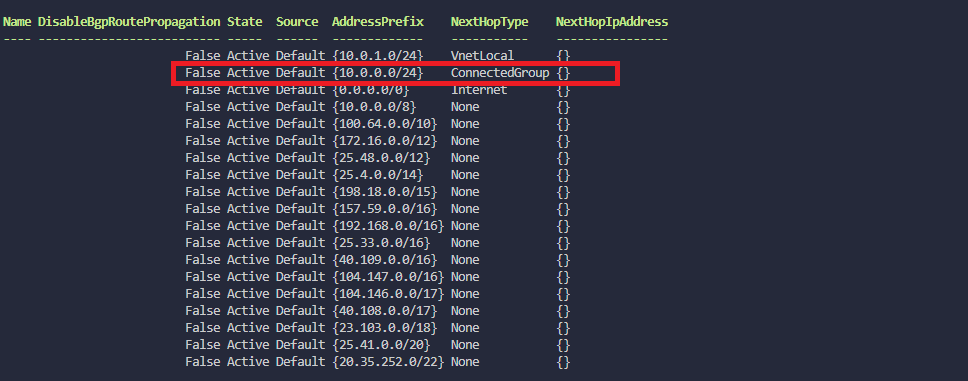
You can see the effective routes in the Azure Portal as well. See the screenshot below. Please focus on the Effective Routes section. I tried to highlight the effective routes in the screenshot. The routes that I have highlighted are the screenshots that are green and red in the screenshot.

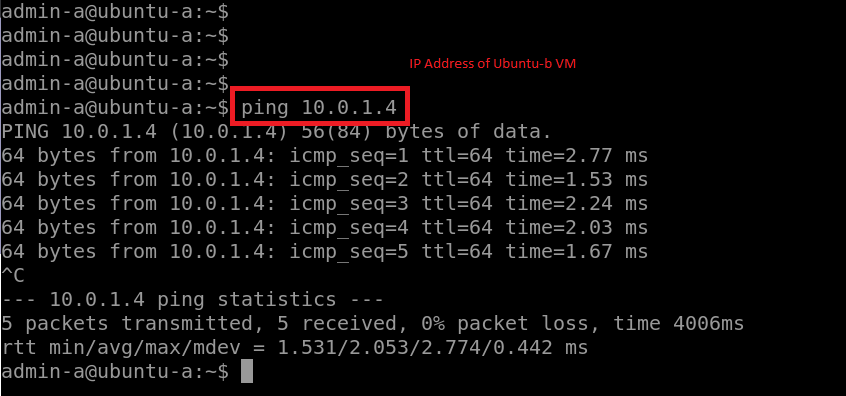
Result of ICMP from ubuntu-a to ubuntu-b. No peerings are required anymore to get the connectivity between the virtual networks. Connected Group capability is doing the magic for us.
I think we have reached the end of the article. I have tried to cover lots of things in this article, and I hope you enjoyed the article. If you have any questions, please feel free to ask me.