· 6 min read
Hasan Gural

Hello Folks,

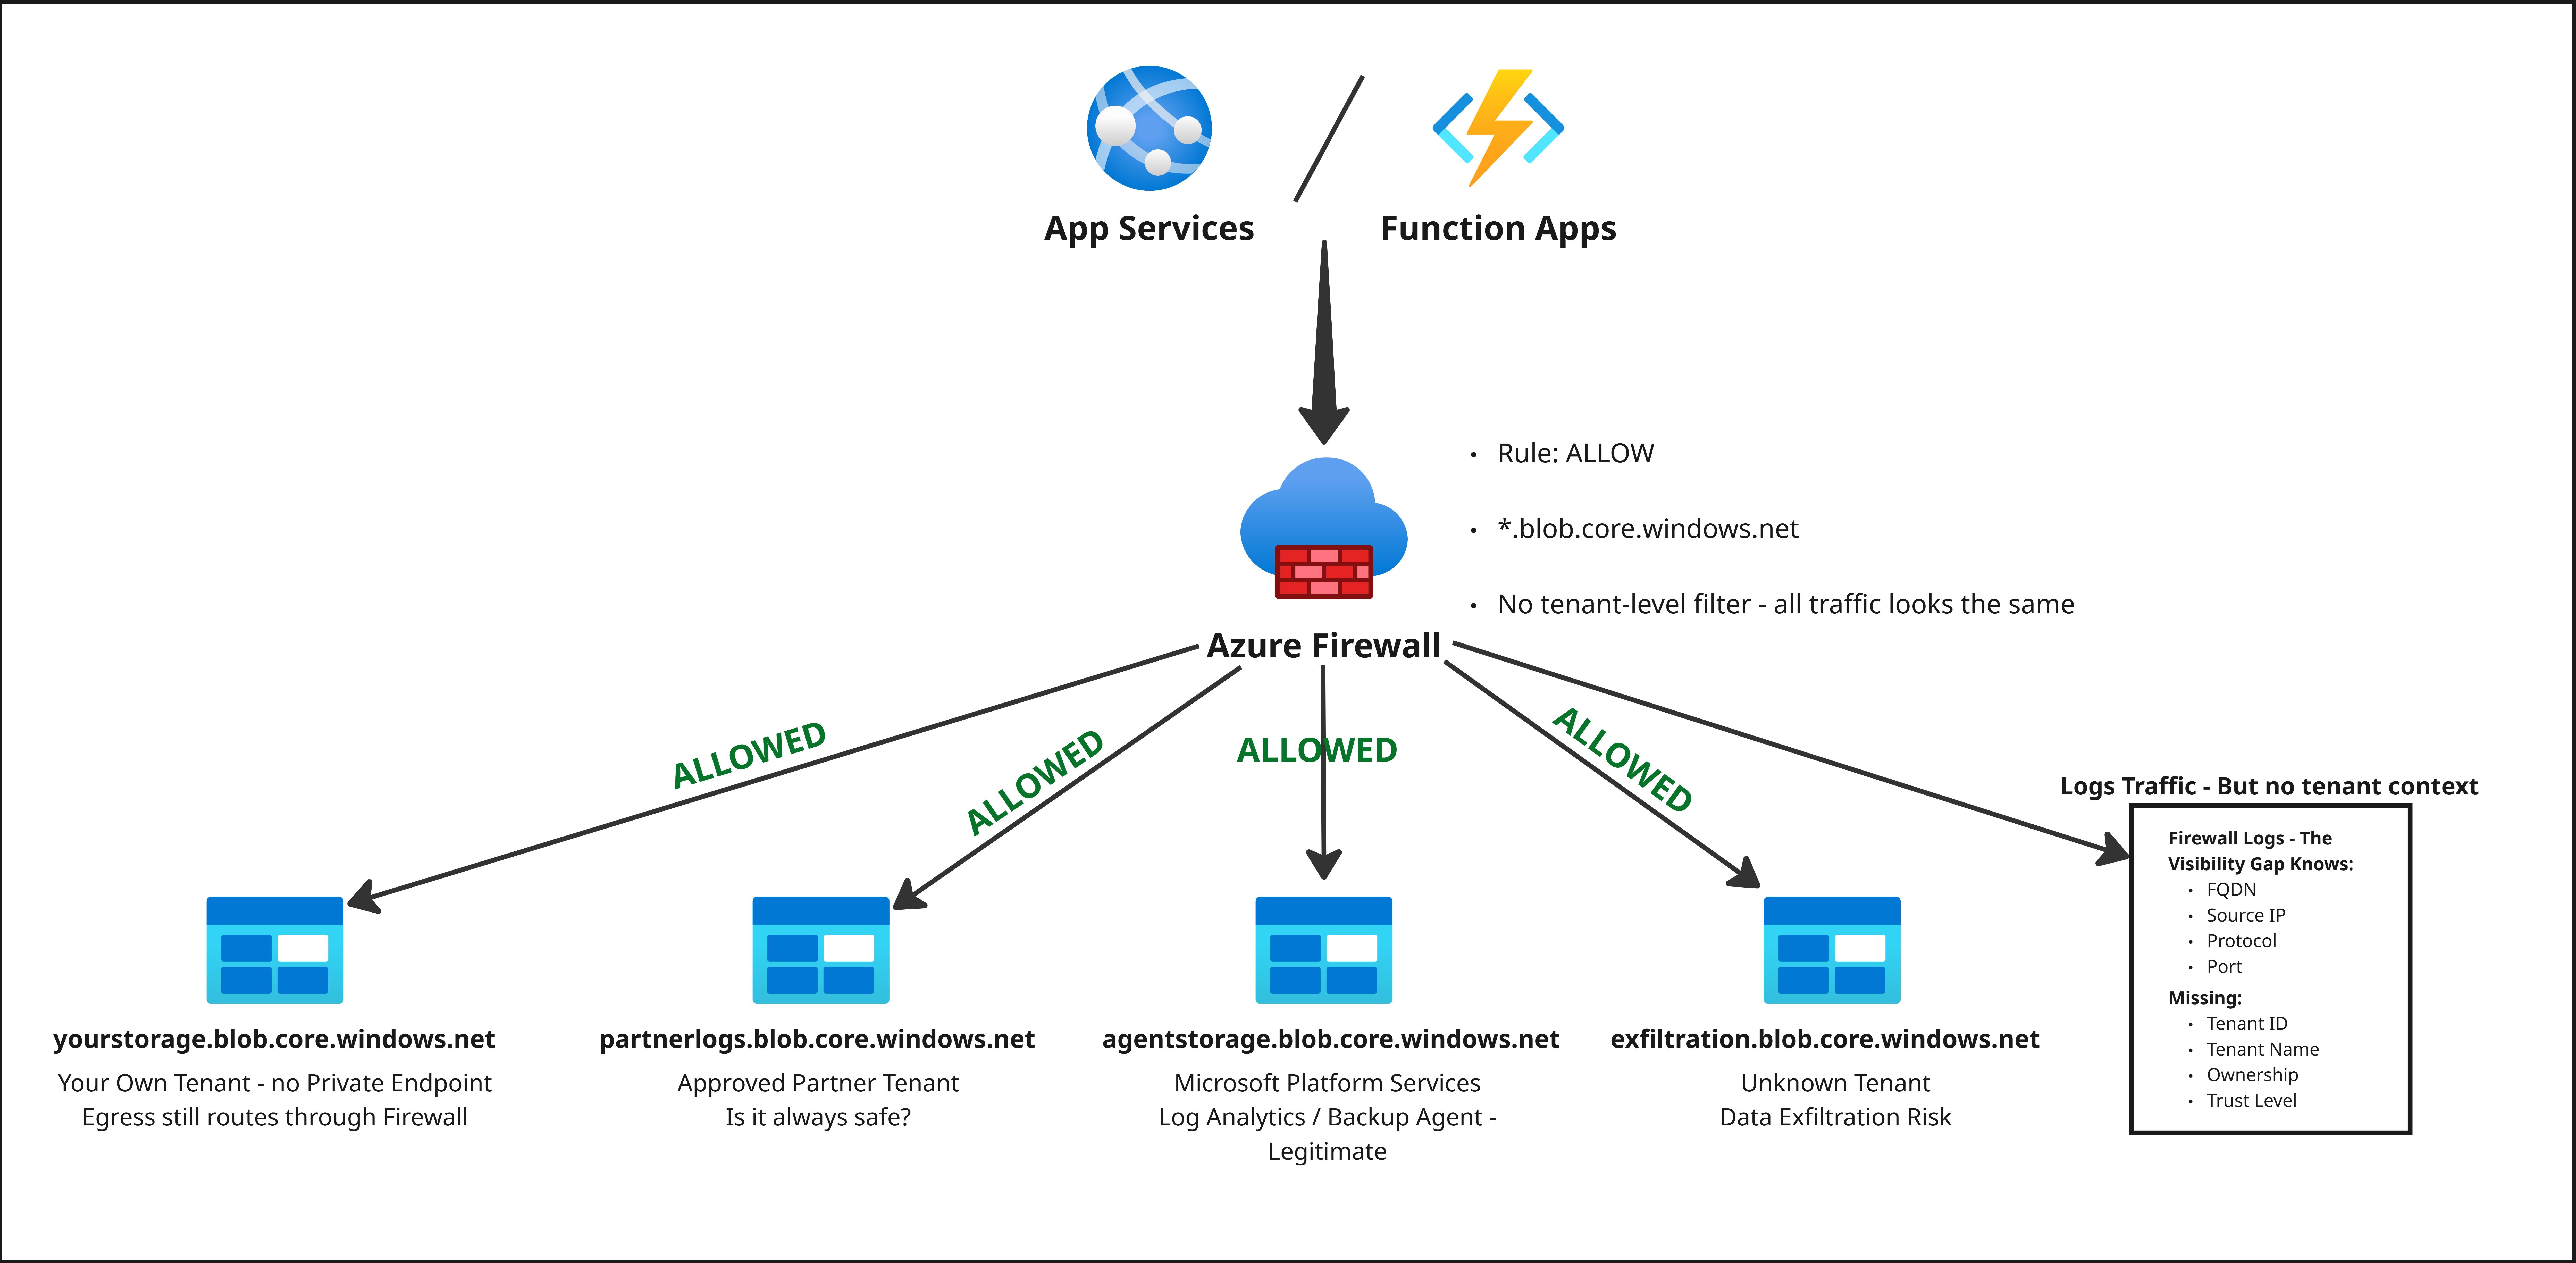
In this article, we will walk through a very serious problem that I have seen in multiple Azure environments in my customers: an Azure environment where outbound firewall rules allowed access to any Azure Storage account on the internet.

GlobalBootCamp2025

On the surface, the rule looked safe enough: outbound access was limited to Azure Storage endpoints. In reality, this meant that any storage account in any tenant was reachable, as long as it lived behind a standard *.blob.core.windows.net or *.dfs.core.windows.net style FQDN. From a data exfiltration perspective, this is a big red flag. Any workload that can send HTTPS traffic to arbitrary storage accounts can quietly move data out of your tenant, and that traffic is almost indistinguishable from normal storage operations.

· 9 min read
Hasan Gural

Hello Friends,

Welcome to the final part of this series. In Part 1 we covered why Premium SSD creates the oversizing problem in the first place, how the pricing model for Premium SSD v2 actually works, and how to identify which disks in your environment are worth migrating. In Part 2 we went through the snapshot-based migration itself, built a PowerShell script that handles the full workflow with a WhatIf mode, and looked at a Bicep pattern for new deployments with zone alignment done correctly from the start.

Now that the disks are running on Premium SSD v2, there is one more thing I want to address, because this is where I see most teams leave money on the table. When you create a Premium SSD v2 disk, you have to decide on IOPS and throughput values at that moment. Most people base that decision on what the old Premium SSD tier was delivering, which was itself a number that came from disk size, not from any measurement of what the workload actually needed. So you migrate, and you carry the same inflated numbers across to the new SKU.

In this part we will look at how to use real utilization data to right-size those values, how to write KQL queries that show you what the disk is actually doing, and how to set up Azure Monitor alerts that surface problems before they affect anything.

· 7 min read
Hasan Gural

Hello Friends,

Welcome back to Part 2. In Part 1 we covered why Premium SSD creates the oversizing problem, how Premium SSD v2 changes the pricing model, the constraints that shape migration planning, and a PowerShell script to identify candidate disks across a subscription. If you have not read that yet, start there because the zone requirement in particular will come up again here.

In this part we go through the actual migration. The good news is that the process is more direct than most people expect: you deallocate the VM, update the disk SKU in place, and restart. There is no new disk to create, no data to copy, and no disk swap. The existing disk is converted to Premium SSD v2 with the same name and resource ID it always had.

· 10 min read
Hasan Gural

Hello Friends,

One of the projects I was recently involved in brought something to my mind that I have been wanting to write about for a while. The team had a solid Azure footprint, a mature DevOps practice, and a FinOps initiative that was starting to ask the right questions about where the money was actually going. When we pulled the disk inventory, the answer was staring back at us: disk after disk on Premium SSD, sized at 2,048 GiB to reach 7,500 IOPS, running workloads that were using 300 GiB of actual storage. The performance need was driving the disk size, not the other way around, and the team had no idea because that is just how Premium SSD works.

This is exactly the kind of spend that FinOps conversations surface once you get past the shiny dashboards and start looking at the actual resource configuration. You are not paying for something wasteful, you are paying for the model. The billing is working exactly as designed. The problem is the design itself, and Premium SSD v2 changes it entirely. Storage, IOPS, and throughput become three independent dimensions you configure and pay for separately. If you only need 300 GiB and 4,000 IOPS, that is precisely what you provision and precisely what you pay for.

In this three-part series I want to walk through the full picture: why the old model creates this pattern, how to identify which disks in your environment are worth migrating, how the migration itself works, and what to do after migration to keep the economics working in your favour. In Part 2 we go through the direct in-place conversion with PowerShell and Bicep. In Part 3 we cover right-sizing, monitoring, and cost governance after migration.

· 10 min read
Hasan Gural

Hello Folks,

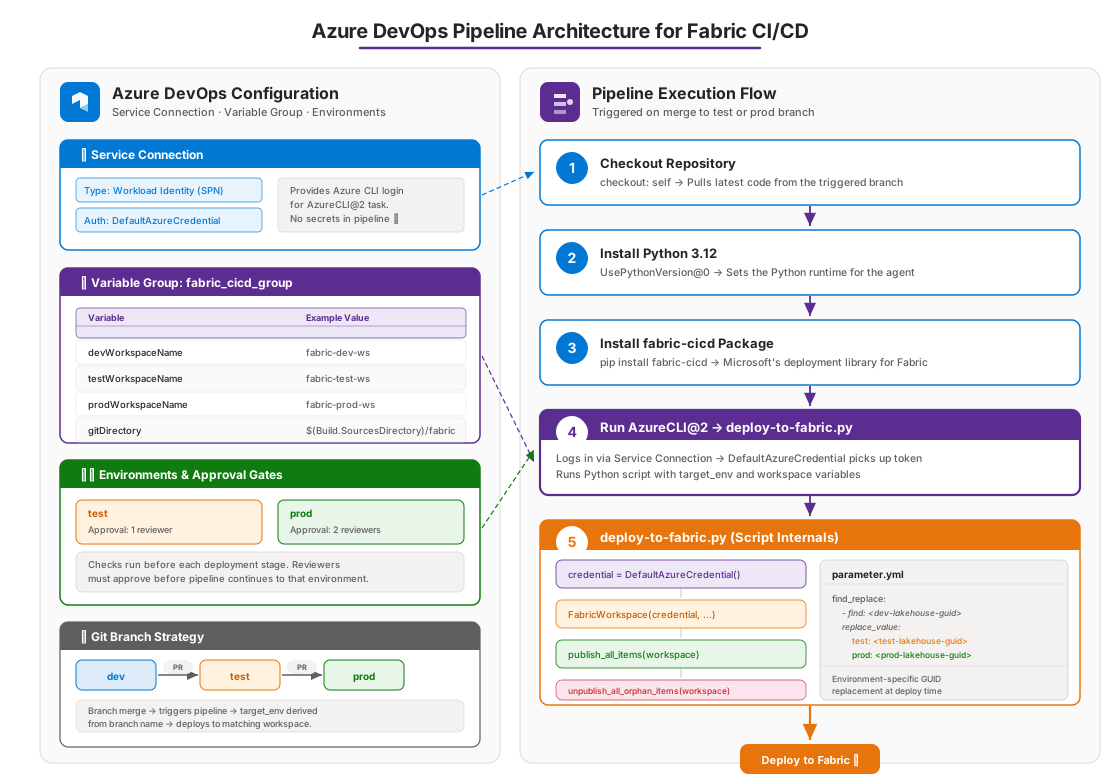
Welcome to the Part 2. In Part 1, we covered the fundamentals of CI/CD for Microsoft Fabric: why it matters, how workspaces and branches map to environments, the flow from dev to test to prod, and the common mistakes to avoid. Now it is time to get practical.

In this part, we will set up everything you need in Azure DevOps to build a working CI/CD pipeline for Fabric. We will go through variable groups, environments with approval gates, the pipeline YAML, the Python deployment script, and the parameter file that handles GUID replacement across environments. By the end, you will have a clear picture of how all the pieces connect.

Azure DevOps Pipeline Architecture for Fabric CI/CD

· 9 min read
Hasan Gural

Hello Everybody,

In these two series, I want to walk you through how CI/CD works for Microsoft Fabric deployments. This is a topic that comes up a lot, and I think the best way to understand it is to start from scratch and build up step by step. In this first part, we will cover the fundamentals: what CI/CD means in the context of Fabric, why it matters, and how the basic building blocks fit together. In Part 2, we will go hands-on with Azure DevOps, the fabric-cicd Python package, parameter files, and a full end-to-end deployment walkthrough.

If you are working with Microsoft Fabric and your team is still deploying things manually, copying items between workspaces, or making changes directly in production, this article is for you.

· One min read
Hasan Gural

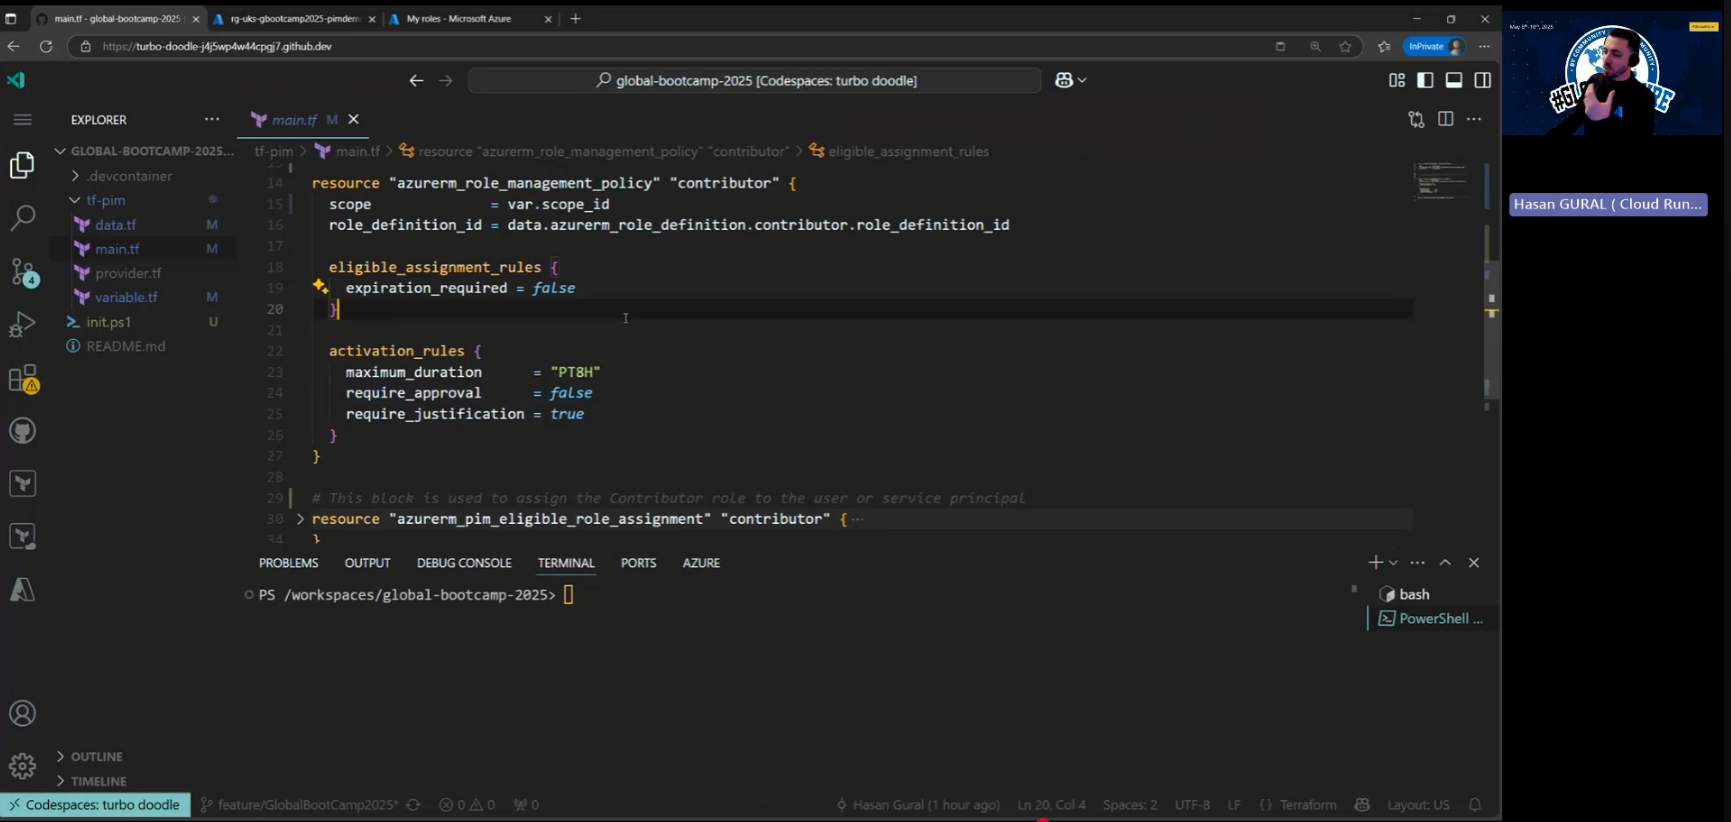
I had a fantastic time speaking at Global Azure 2025 in Istanbul (May 8–10). The session was recorded and I published the video on YouTube. I am sharing the recording of my talk, "Automating Azure PIM Role Assignments with Terraform". Whether you attended live or couldn’t make it, you can now watch the full session at your convenience.

GlobalBootCamp2025

· One min read
Hasan Gural

I'm excited to announce that, continuing my journey since 2017, I will be speaking at the Azure Global Bootcamp 2025 on May 8- 10. This year, I’m eager to share more insights and learnings with the Azure community. Join me as we dive into the latest Azure advancements and tackle current tech challenges together.

GlobalBootCamp2025

· 6 min read
Hasan Gural

Welcome back, Friend!

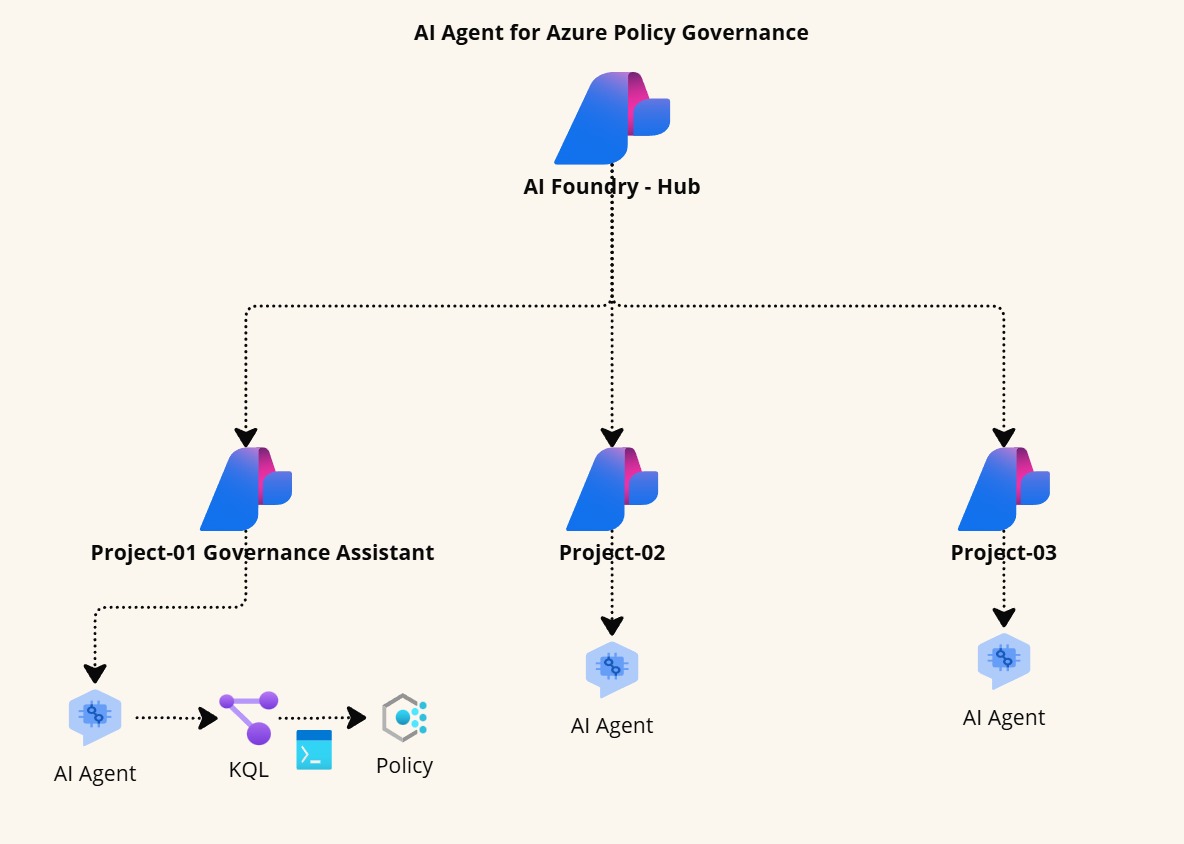
In the previous article, we covered setting up the necessary resources for the AI Agent for Azure Policy Governance Assistant. Now, we will proceed with the final steps to complete and test the AI Agent:

  • Create the AI Agent using the Azure AI Foundry UI or PowerShell.
  • Develop and provide an example KQL query for retrieving compliance data.
  • Execute the KQL query and upload the results to the AI Agent’s Knowledge.
  • Test the AI Agent to ensure it accurately responds to policy compliance queries.

· 5 min read
Hasan Gural

Hello Friend,

Today, I’m going to build a quick-win solution called the AI Agent for Azure Policy Governance Assistant. This AI Agent is meant to help you rapidly identify non-compliant policies and improve governance across your Azure subscriptions or resource groups. Imagine that being able to ask the AI Agent questions like, "Which resources are non-compliant?" or "Which exemptions are about to expire within my subscription scope?" In this article, I’ll walk you through setting up the necessary resources using PowerShell scripts, and then show you how to integrate them with an AI Agent for actionable governance insights.

Overview