To make a comprehensive expression for Office 365 Groups' structure, we need to understand what does it comprise also why should it be used by customers. In this article, you will read the description of Office 365 groups step by step. Before starting, we can look over the answer of Christophe Fiessinger, Microsoft Office 365 program manager, to the question "What are the Office 365 Groups ? "
There were a lot of small obstacle in the past. These were creating many delays in the running a project process. Now with Office 365 Groups, we are observing that Office 365 Groups are meeting our user's needs. Because there's no one size that fits all, whether it's managing a project, running a team, a community of interests, or community of practice, we want to delight the users and make people's lives easier. 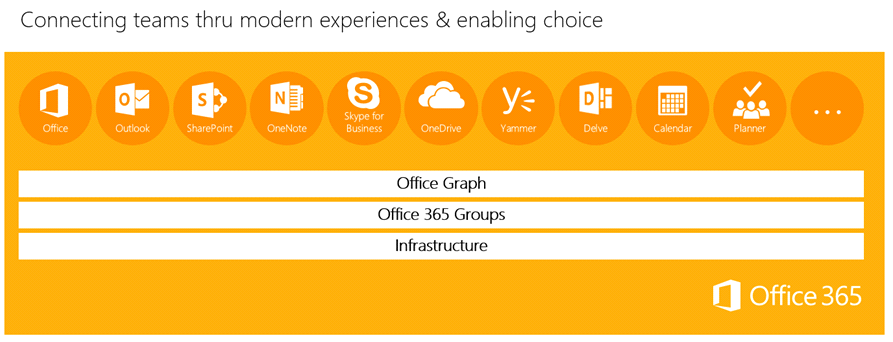
Office 365 groups are working with Office 365 tools so that it helps you to collaborate with your colleagues for writing or editing documents, scheduling meeting dates, working on projects and sending emails. When an Office 365 group is created, hidden processes in the background will automatically create a workspace for group which that shared workspace is a way to use every each product on team based projects. Groups in Office 365, you can choose whoever you wish to collaborate with, besides it easily creates a collection of resources for those people you want to work together. The general resources such as a shared Outlook inbox, shared calendar or a document library for collaborating on files. Office 365 is providing a shared workspace for emails, conversations, files, calendar events. While you are sending messages in the shared Outlook inbox, all conversations will be stored. There is a dedicated calendar to set dates and a dedicated OneDrive for business storage, which is available for group files or documents
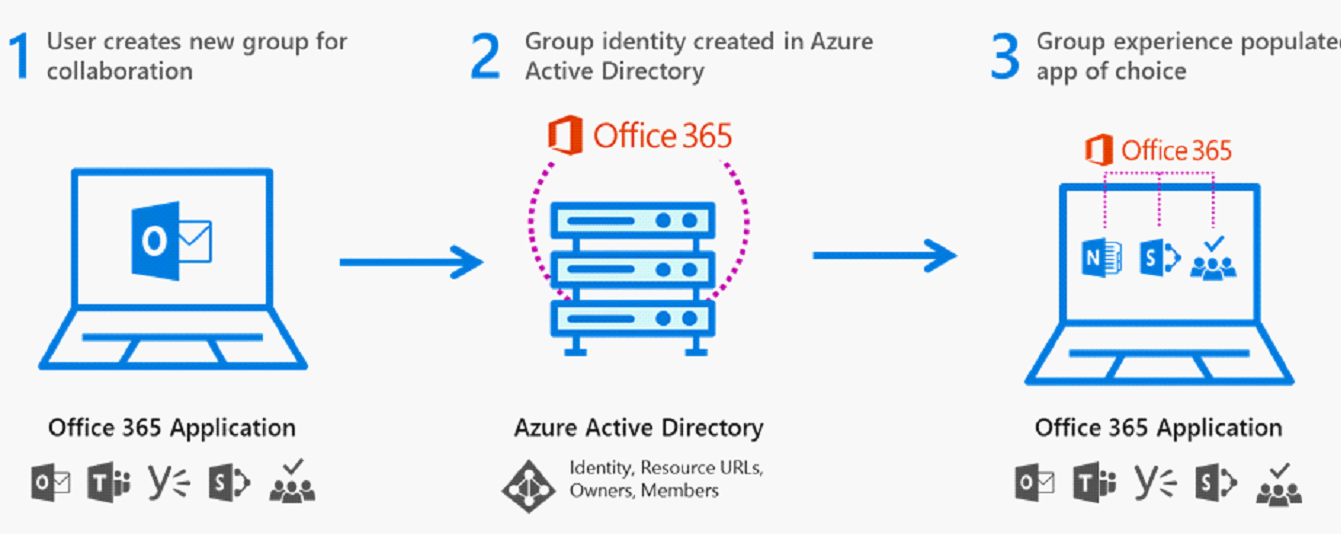
With Office 365, Microsoft follows an approach which based on users. That means there will be a convenience for users to create their own groups. Especially, this convenience will give a permission to administrators for managing some of the group capabilities.
To sum up the difference between private and public office 365 groups extensively, a public group is open to everyone, but a private group has a more individual structure. For instance; if you are in a public group you will be able to visit it, read the content and check out the conversations on the group's page. Also, it is providing a membership to you whenever you want. You can subscribe the group to get mail notifications about group discussions. But on the other hand, as we can understand, a private group is exclusive which is only available for its members. There is a security for its content and conversations, if you are not a member of that private group that means you will be not able to view these informations. A private Office 365 group, without any doubts, will be a good choice for people who have an interest in security or privacy. For being a member of a private group, you must obtain an approval from the group administrator. Also private or public groups can receive emails. Mind you, your group type will be a permanent choice which that means you cannot change the type of your group.
Office 365 groups have several limitations about group members and owners:
• Maximum number of owner in a group is 10 • There can be 250 groups of a user • Office 365 doesn't have a number limitation of members, but there might be a problem about performance limits.
Office 365 groups are based on user. That means the users in your organization will be able to create and join. They can even remove themselves from Office 365 groups. This is acceptable for Office 365 groups' creations too. The users can create groups directly from Outlook but also there is a chance to create groups via Microsoft Edge in Office 365. If you want to create Office 365 Groups, you can use other tools Outlook on the web, Outlook Mobile, SharePoint, Planner, Teams and more. Which tool you choose to start from depends on what kind of group you're working with.
While you are creating an Office 365 group, a few things are happening in the background:
• Creation of Azure Directory User is completed. • Creation of a Mailbox is completed. • Creation of an OneDrive for Business page is completed. • Creation of an OneNote Notebook is completed.
The components of The Office 365 groups are a file store and a mailbox store. It can take a long time to create the groups. The reason of that is Office 365 groups have several components. Also groups have interaction with every Office 365 services for instance Outlook, SharePoint, Yammer, Delve and Planner.
During the groups are based on users, users and administrators will be able to create the groups. Assume that you are a global administrator then you can create groups in Office 365 admin center and there is no necessity to be a member of that Office 365 group for it.
The path that you should follow to create Office 365 group in Office 365 admin center:
• You need to sign in http://portal.office.com as a global administrator • Visit the Office 365 admin center by using the app launcher • In the left navigation pane, select Groups and then click Groups. • Click Add a group
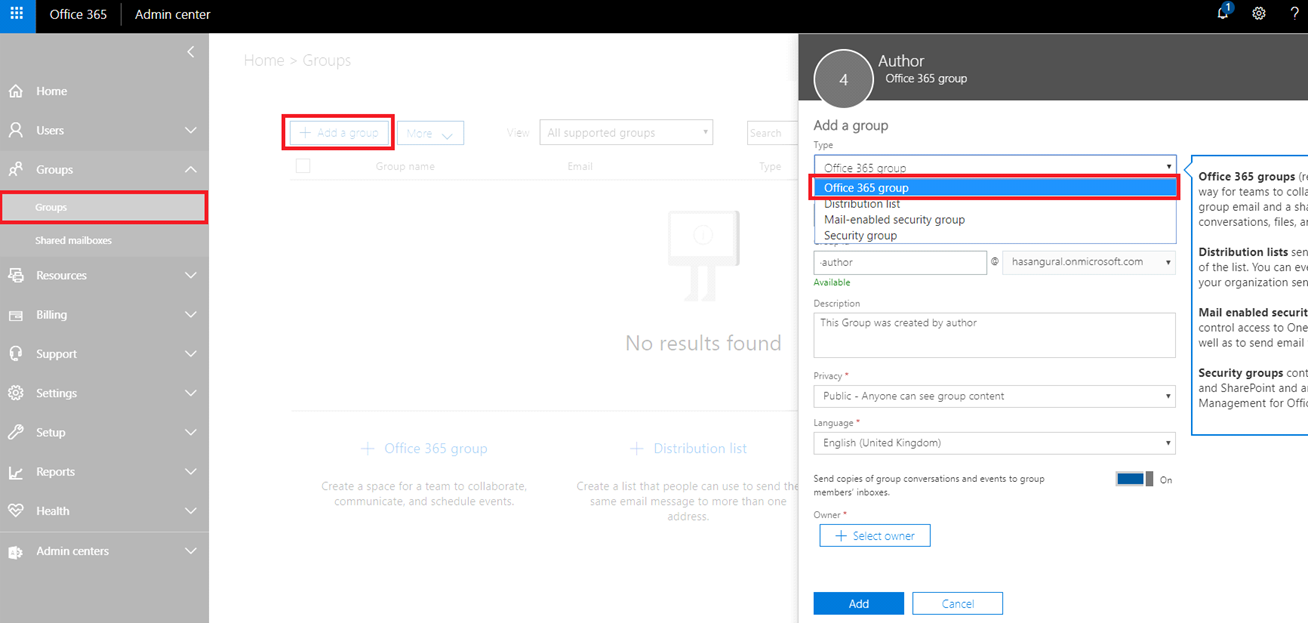
On the right pane, you have four options for group type: Office 365 group, Distribution list or Security group. Select Office 365 group.
Review the Office 365 options. Type a name, an email address, and a description. Select if the group will be public or private, and then select the language.
• Select the group owner. The group owners are the ones who can manage the group. • Select if group members are subscribed to the group or not subscribed. • Click Add.
Please take a note: If group members are subscribed to your group, they receive all messages and calendar items in their inbox. Perhaps They need some update their Outlook.
How can we edit and configure Office 365 groups?
- Sign in to http://portal.office.com as your company global administrator. 2. Go to the Office 365 admin center by using the app launcher 3. Select Groups in the left navigation pane) 4. Click the group. ( Which groups want to change ) 5. Select one of the options below: Edit Members and Owners. By using this option, you can add and remove members from a group, select a new group owner, or change the status of the group admin. Delete Group. If you do not need the group anymore, delete it. The group, its email conversations, calendar, and documents stored in OneDrive for Business storage will be deleted along with the group. This action cannot be undone.
Please take a note:
Edit Details Action: Sometimes it is necessary to change or update the name of your Office 365 group. This name appears in the address book, on the To: line in the email, as the name of the group. A group description helps your users when they want to decide which groups ours.

Conversations and email: • Users can access group conversations either through Outlook or the Outlook Web App Group calendar: • Every member of the group automatically sees meeting invites and other events Files, sharing, and SharePoint document library • A group's SharePoint document library page is the primary place for group files Subscribing to a group: • Subscribing is not enabled by default. Each user can decide to subscribe or not subscribe to a group
Note: If group members are subscribed to a group, they receive all messages and calendar items in their inbox.

During the Office 365 groups are enabled in your hirer, users can access Office 365 groups in all Office 365 services. In their Outlook Web App and OneDrive for Business, Office 365 groups are accessible for users. By the way, Office 365 Planner contains the Office 365 groups and there is a chance to see them in the Outlook 2016 client. Currently, we can say that Office 365 groups are open and discoverable by default. Users can explore the groups with controlling memberships, viewing conservations and files. And then if there are anything interests users, they can join the groups and start attending as a member in groups.
There are very few more important things than communication to consider for groups. As we have talked about, there is a mailbox for every each group and Outlook or the Outlook Web App is providing accessibility for group conversations to every each user. There are privacy and protection for group conversations. Thus, Office 365 warranting that new member can present and introduce themselves to group content quickly. You can view conversations by their date and also you can share your acclaim for group conversations with your 'like'.
Furthermore, you have the ability to send an email by adding the group name to the To: section of your email. With this, you can send it. If you don't have an Office 365 license or an email address which contains Office 365 hirer, there isn't a chance to be a member of a group as an external user. But you are always able to send emails to a group as an external user for sure.
So since every group has a special and dedicated calendar, every member of the groups can automatically see meeting invites and other events. All group calendars can be viewed in Outlook Web App and Outlook. The events that you have created in the group calendar will be added and auto-synchronized with your private calendar. Every group contains its own document libraries within SharePoint team site. We can think the document library of a group as the primary place for group files. Also to add your folders, custom scripts on personal sites feature must be disabled.
You can be a member of any group and to subscribe it. With subscribing a group, conversations or events of the group will be sent to your inbox. You can join the group conversations with your answers without using any other things. Subscribing is not enabled in normal circumstances. This is users' decision to subscribe to a group or not. Thereby, you can join the groups which most related to you.


