
Hello Friends,
In this two-part series, I want to share a practical use case for GitHub Copilot Agent Skills, and it is something I have been exploring recently and find genuinely useful for day-to-day Azure operations. The idea is simple and following: instead of navigating the Azure portal to raise a Privileged Identity Management (PIM) request to cover your day to day operation for overarching tasks, you just ask Copilot in plain language, and it takes care of the rest.
Before getting into the implementation, let me quickly explain what Copilot Agent Skills are and why they are worth your attention.
What Are GitHub Copilot Agent Skills?
GitHub Copilot in VS Code supports an agent mode that goes beyond answering questions or generating code. When operating in agent mode, Copilot can discover capabilities (called skills) that are defined directly inside your workspace. Each skill tells Copilot what it can do, what parameters it needs, and gives example phrases to help with intent matching. While we are writing the Article, it might be already changed but at the time of writing for the license side of things.
A skill is defined simply as a Markdown file (SKILL.md) placed inside a skill folder in your project. The folder also contains the actual scripts or tools that the skill invokes. When you open Copilot Chat and switch to agent mode, Copilot reads those definition files and makes those capabilities available as part of the conversation.
A generic skill folder looks like this:
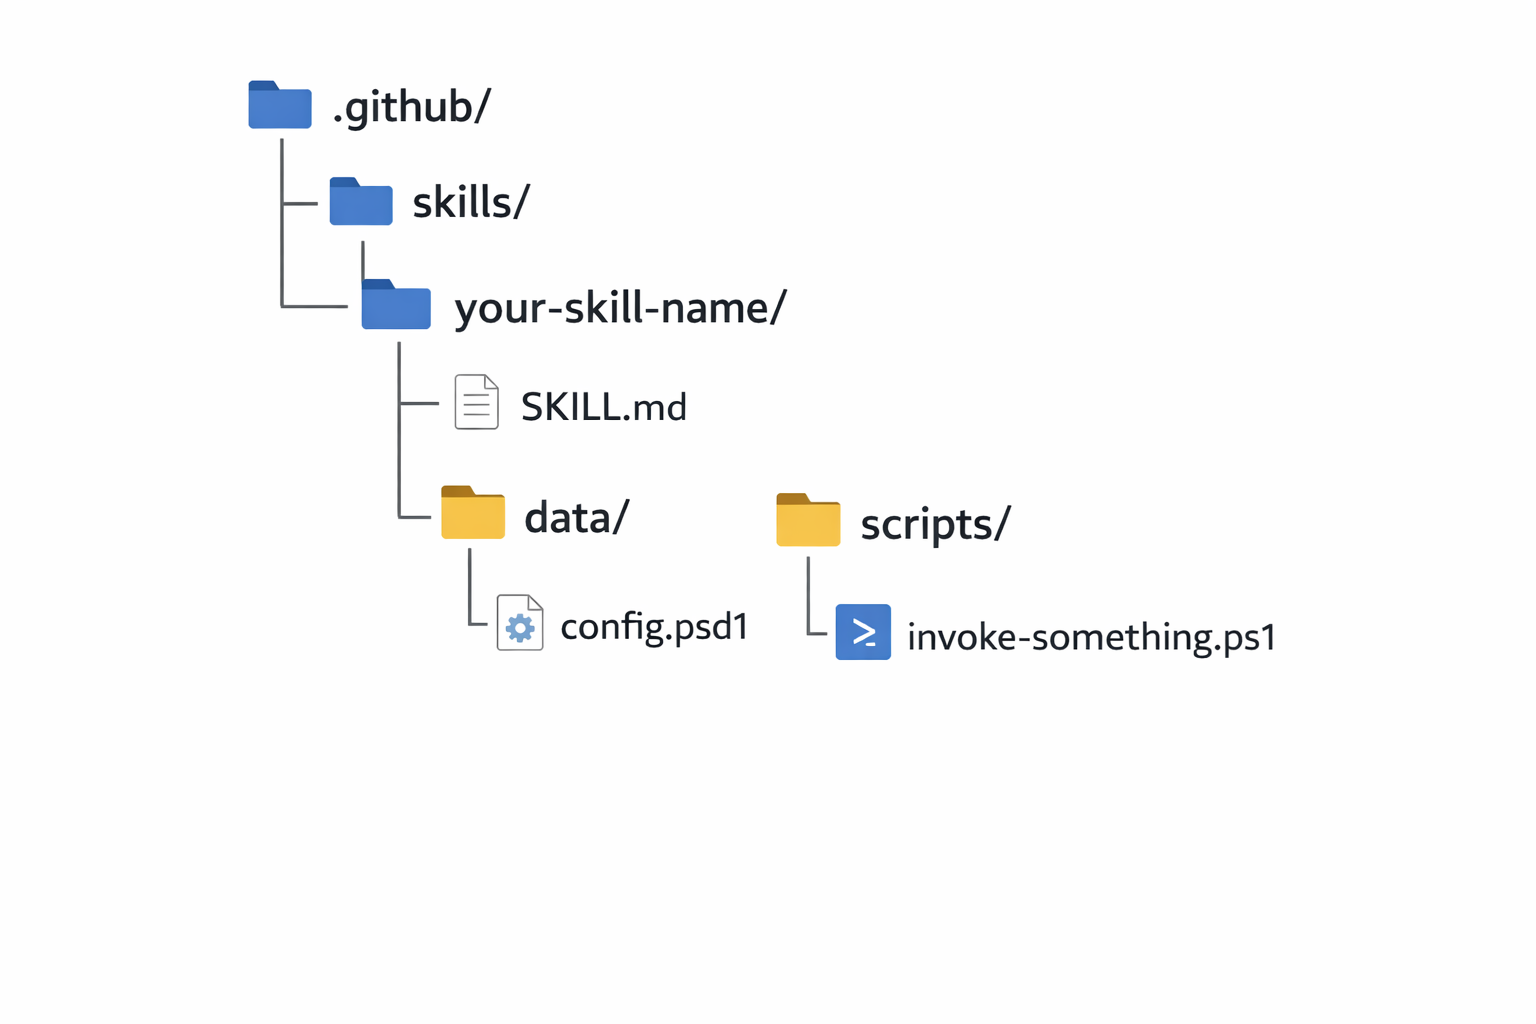
The .github/skills/ path is the convention GitHub Copilot expects when scanning the VSCode workspace for skills. Each subfolder inside skills/ is treated as an individual skill. The SKILL.md is the only required file inside each skill folder. The rest of the layout is up to you, as long as the scripts referenced inside SKILL.md are reachable from that path.
The practical effect is that you can describe what you want in plain language, for example "Activate my Contributor role on the Connectivity subscription for 2 hours", and Copilot will match that to the right skill, extract the parameters from your message, confirm with you, and then run the underlying script. You do not have to remember command names, parameter flags, or subscription GUIDs.
This is different from Copilot just generating a script for you on the fly. The skill already exists, it has defined boundaries, and Copilot is orchestrating its execution based on your intent.
Why Use Copilot Agent Skills for PIM Management?
Azure PIM is a solid security control. It ensures that privileged roles like Contributor or Owner are not permanently assigned and require a conscious activation step with a justification and time limit. The problem is the activation workflow in the Azure portal. You open the portal, navigate to PIM, find the right subscription, find your eligible role, fill in the justification, set the duration, submit, and wait for the activation to complete. That is a lot of steps for something you might need to do several times a day.
The script-based alternative is faster, but it still requires you to know the subscription ID, the exact role name, and how to call the right ARM API endpoints. If you are not doing it regularly, you will forget something and have to look it up.
The Copilot Agent Skill approach solves both problems. The activation logic lives in a script that handles the API calls correctly. The mapping file defines what is permitted. And Copilot acts as the interface: you describe what you need, it figures out the parameters, and it runs the right script.
How Copilot Discovers Skills
When Copilot runs in agent mode, it scans the folders in your current VS Code workspace for SKILL.md files. Any folder that contains a SKILL.md is treated as a skill. Copilot reads the description, parameter definitions, and example phrases from that file and makes the skill available during the conversation.
A few important things to know about discovery:
- The skill folder can be placed anywhere inside the workspace. There is no fixed location required. Copilot will find it as long as the workspace is open in VS Code.
- The folder name does not matter to Copilot. It reads the
SKILL.mdcontent, not the folder name. - You can have multiple skills in the same workspace. Each skill folder with a
SKILL.mdwill be discovered independently. - Copilot only scans the workspace that is currently open. If the
pim-advisorfolder is not part of your VS Code workspace, the skill will not be available.
This is why opening the right workspace in VS Code before starting a Copilot agent conversation is important. If your skill folder is in a separate repository or a different folder, you need to make sure it is included in the workspace, either as the root or as an additional workspace folder.
Project Structure
The PIM Advisor skill lives under .github/skills/pim-advisor. The folder structure looks like this:
.github/
└── skills/
    └── pim-advisor/
        ├── SKILL.md
        ├── data/
        │   └── rolesMapping.psd1
        └── scripts/
            └── activateAzResourcePimRole.ps1
There are three components here. SKILL.md is the skill definition that Copilot reads. rolesMapping.psd1 is the policy file that defines which subscriptions, roles, and principals are permitted. activateAzResourcePimRole.ps1 is the script that makes the actual API calls to activate the PIM role. We will go through each of them in detail.
In this part, we will cover the mapping file and the activation script. In Part 2, we will write the SKILL.md, look at how Copilot resolves natural language to script parameters, and walk through testing the full flow.
Prerequisites
Before you start, make sure you have the following in place:
- Visual Studio Code with the GitHub Copilot extension installed
- Azure PowerShell (
Azmodule) installed - An Azure subscription where you have eligible PIM assignments configured for your account
- Basic understanding of Azure RBAC and Privileged Identity Management
GitHub Copilot License Requirements
Agent mode and Agent Skills are available on GitHub Copilot Individual, Business, and Enterprise plans. There is no separate tier required specifically for agent mode, but you do need an active Copilot subscription to use it. Free-tier access to Copilot (for example through GitHub Copilot Free with usage limits) also supports agent mode, but the models available to you depend on your plan.
One thing worth clarifying: the model you choose inside agent mode matters for how well skills are resolved. More capable models, like GPT-4o or Claude Sonnet, handle parameter extraction and intent matching more reliably than smaller models. If you are on a Business or Enterprise plan, those models should already be available to you in the Copilot Chat model picker. If you are on the free tier, you may be limited to a smaller model and the skill matching may be less accurate.
So to summarize: you do not need a special license tier just for Agent Skills, but you do need a Copilot subscription, and picking a capable model will give you better results.
Enabling Agent Mode in VS Code
Agent mode is not enabled by default in all VS Code builds. To make sure it is turned on, open your VS Code settings (Ctrl+,) and search for chat.agent.enabled. Set it to true if it is not already. You can also do this through settings.json:
{
  "chat.agent.enabled": true
}
Once enabled, you will see a mode picker at the top of the Copilot Chat panel. Switch it from Ask to Agent before sending your request. Skills are only discovered and invoked when you are in agent mode.
The Mapping File: rolesMapping.psd1
The mapping file is a PowerShell data file (.psd1) that acts as the policy document for the skill. It defines exactly what the skill is allowed to do: which subscriptions it can target, which roles it can activate, and which principals are permitted to make requests.
Here is the full mapping file:
@{
    Version = "1.1"

    Defaults = @{
        DurationInHours = 1
        Justification   = "Access requested via LLM trigger"
    }

    Subscriptions = @(
        @{
            Name           = "Connectivity Subscription - Non-Prod"
            SubscriptionId = "2d8c1a9e-3d5b-4c6a-9f1e-123456789abc"

            AllowedPrincipals = @(
                "60c87e44-5905-4e54-aa0e-1f88a5e87725"
            )

            Roles = @(
                "Owner"
                "Contributor"
            )
        },
        @{
            Name           = "Connectivity Subscription - Prod"
            SubscriptionId = "e2cb1f9a-7d8e-4f2a-8c3b-abcdef123456"

            AllowedPrincipals = @(
                "60c87e44-5905-4e54-aa0e-1f88a5e87725"
            )

            Roles = @(
                "Owner"
                "Contributor"
            )
        }
    )
}
A few things to highlight here. The Defaults block sets the fallback values for duration and justification when the user does not specify them in their request. The Subscriptions array is where you define each environment: the friendly name that users will refer to in their messages, the actual subscription GUID, the allowed principal Object IDs, and the roles that can be activated.
The friendly Name field is important, and it is what bridges the gap between what a user types ("Connectivity Non-Prod") and what the script needs (a subscription GUID). Copilot will use the name to resolve the correct subscription entry from this file before passing anything to the script.
If you want to add more subscriptions or roles, you extend this file. No changes to the script are required.
The Activation Script: activateAzResourcePimRole.ps1
The script (is not full mature yet, it is still in development and testing phase) is responsible for the actual PIM activation. It accepts the subscription ID, role name, duration, justification, and optionally a principal ID, and it calls the Azure Resource PIM API to request a SelfActivate assignment. Here is the complete script:
param (
    [Parameter(Mandatory = $true)]
    [string]$subscriptionId,

    [Parameter(Mandatory = $true)]
    [string]$roleName,

    [Parameter(Mandatory = $false)]
    [int]$durationInHours = 8,

    [Parameter(Mandatory = $false)]
    [string]$justification = "PIM activation via PowerShell",

    [Parameter(Mandatory = $false)]
    [string]$principalId
)

$ErrorActionPreference = "Stop"

if (-not (Get-Module -ListAvailable -Name Az.Accounts)) {
    Write-Host "Installing Az.Accounts module..." -ForegroundColor Yellow
    Install-Module Az.Accounts -Scope CurrentUser -Force
}

Import-Module Az.Accounts

try {
    $azContext = Get-AzContext
    if (-not $azContext) { throw "Not authenticated" }
}
catch {
    Write-Host "Not authenticated. Opening browser for Azure login..." -ForegroundColor Yellow
    Connect-AzAccount -Subscription $subscriptionId | Out-Null
}

$WarningPreference = "SilentlyContinue"
Set-AzContext -Subscription $subscriptionId | Out-Null

$secureStringtoken = (Get-AzAccessToken -ResourceUrl "https://management.azure.com").Token
$ssPtr = [System.Runtime.InteropServices.Marshal]::SecureStringToBSTR($secureStringtoken)
try {
    $token = [System.Runtime.InteropServices.Marshal]::PtrToStringBSTR($ssPtr)
}
finally {
    [System.Runtime.InteropServices.Marshal]::ZeroFreeBSTR($ssPtr)
}

$headers = @{
    Authorization  = "Bearer $token"
    "Content-Type" = "application/json"
}

$roleDefUri = "https://management.azure.com/subscriptions/$subscriptionId/providers/Microsoft.Authorization/roleDefinitions?api-version=2022-04-01"
$roleDefs   = Invoke-RestMethod -Method GET -Uri $roleDefUri -Headers $headers
$roleDef    = $roleDefs.value | Where-Object { $_.properties.roleName -eq $roleName }

if (-not $roleDef) {
    throw "Role '$roleName' not found in subscription."
}

$roleDefinitionId = $roleDef.id

if (-not $principalId) {
    $account     = Get-AzContext
    $principalId = (Get-AzADUser -UserPrincipalName $account.Account).Id
}

$scope = "/subscriptions/$subscriptionId"

$eligibilityUri = "https://management.azure.com/subscriptions/$subscriptionId/providers/Microsoft.Authorization/roleEligibilityScheduleInstances?api-version=2020-10-01"
$eligibilities  = Invoke-RestMethod -Method GET -Uri $eligibilityUri -Headers $headers

$eligibleAssignment = $eligibilities.value | Where-Object {
    $_.properties.principalId      -eq $principalId -and
    $_.properties.scope            -eq $scope -and
    $_.properties.roleDefinitionId -eq $roleDefinitionId
}

if (-not $eligibleAssignment) {
    throw "No eligible PIM assignment found for role '$roleName'."
}

$activationId  = (New-Guid).Guid
$activationUri = "https://management.azure.com/subscriptions/$subscriptionId/providers/Microsoft.Authorization/roleAssignmentScheduleRequests/$activationId`?api-version=2020-10-01"

$payload = @{
    properties = @{
        requestType      = "SelfActivate"
        principalId      = (Get-AzADUser -UserPrincipalName $azContext.Account).Id
        roleDefinitionId = $roleDefinitionId
        justification    = $justification
        scheduleInfo     = @{
            startDateTime = (Get-Date).ToUniversalTime().ToString("o")
            expiration    = @{
                type        = "AfterDuration"
                endDateTime = $null
                duration    = "PT${durationInHours}H"
            }
        }
    }
}

try {
    Invoke-RestMethod -Method PUT -Uri $activationUri -Headers $headers -Body ($payload | ConvertTo-Json -Depth 10) | Out-Null
}
catch {
    Write-Error "Failed to activate PIM role '$roleName': $($_.ErrorDetails.Message)"
}

Write-Host "Azure Resource PIM role '$roleName' activated on subscription $subscriptionId for $durationInHours hour(s)." -ForegroundColor Green
Let me walk through the key steps. The script starts by ensuring the Az.Accounts module is available and that there is an active Azure session. If no session exists, it opens a browser login. It then sets the context to the target subscription and retrieves an ARM bearer token.
The role resolution step (roleDefinitions API call) converts the friendly role name, like Contributor, into the full resource ID that the PIM API expects. This is necessary because the PIM API works with role definition resource IDs, not role names.
Before attempting the activation, the script calls roleEligibilityScheduleInstances to verify that the principal has an eligible assignment for the requested role on the target subscription. This check is important: if there is no eligible assignment, the activation request would fail at the API level anyway, but checking first gives a cleaner error message.
Finally, the activation is submitted as a PUT request to roleAssignmentScheduleRequests with a SelfActivate request type. The duration is expressed in ISO 8601 duration format (PT${durationInHours}H), and the schedule start time is set to now.
The script works perfectly well outside of Copilot too. If you want to invoke it directly from a terminal, you can call it with explicit parameters:
.\activateAzResourcePimRole.ps1 -subscriptionId "2c8c1a9e-3d5b-4c6a-9f1e-123456789abc" `
                                -roleName "Contributor" `
                                -durationInHours 2 `
                                -justification "Investigating production issue"
Copilot is just the interface that resolves those parameters from plain language and calls the script on your behalf.
What's Next?
In Part 2, we will write the SKILL.md definition that makes all of this available to Copilot in agent mode. We will look at how Copilot maps a natural language request to the correct parameters, walk through the full activation flow end to end, and test a few different prompt variations to see how the skill handles them.