Bu yazı içerisinde Azure Route Table veya diğer adıyla bilnen User-Defined Route Table konusu hakkında detaylı bir şekilde bahsetmek istiyorum. Temel olarak User-Defined Route Table yaratılmasındaki gaye, Azure üzerinde konumlandırdığınız Network Virtual Appliance (WAN Accelator, Firewall ) cihazlarına trafiğin yönlendirilmesine yardımcı olur. Bildiğiniz gibi Azure üzerinde bir Virtual Network oluşturduğunuz zaman bunun yönetimi tamamen Software-Defined Networking olduğunu (SDN) için Microsof tarafından yapılmaktadır. Her oluşturacağınız Address Space, Subnet aynı Virtual Network içerisinde ise doğuştan ( temel olarak ) birbirleriyle haberleşirler.
Öncelikle şunu çok iyi anlayalım. Neden Azure tarafında User-Defined Route tablolarına ihtiyacımız var. Artık birçok şirket artık Azure üzerindeki kaynaklarının İnternet trafiğini inbound veya outbound tamamıyla Network Virtual Appliance üzerine devretmek istiyor. Microsoft Azure bizlere Marketplace üzerinde sunduğu ve desteklediği birçok çözüm var. Bunlar sırasıyla, Fortigate, Juniper, Cisco ve Checkpoint olarak adlandırabiliriz. Bunun yanı sıra Microsoft artık Azure Firewall adında tamamıyla bir firewall as a service hizmeti sunmaktadır. Bu kısımda maliyet yönetim ve esneklik devreye giriyor. Eğer siz third-party bir Network Virtual Applaince kiraladığınız zaman BYOL ve Core başında kullandığınız kadar ödeme modeli çıkmaktadır. Açıkcası bunlar benim kafamda oturtamadığım kadar pahalı gözükmektedir. Tercih meselesi ve ihtiyaçlardan oluşan bir durum işin özeti aslında. Tek bir Network Virtual Appliance koyma şansınız ne yazıkki çok gözükmüyor bu seferde Single Point of Failure kavramına takılıyor olacaksınız. Bu yüzden en az iki adet Availbility Set içerisinde Network Virtual Appliance konumlandırmalısınız ki hizmetiniz kesinti yaşamasın. Bunun dışında SNAT ve DNAT sorunlarına detaylandırıp canınızı hiç sıkmak ve anlatmak istemiyorum, orası yeni yeni Azure Load Balancer tarafında destekleniyor.
En basit haliyle, Azure tarafından atanan Virtual Network yönetiminde, Default Routes veya System Routes olarak adlandırabileceğim bir durum var. Bu Route tabloları tamamiyle Microsoft Azure tarafından yönetilir. System Route Table, temel olarak Sanal Sunucular arasındaki trafiği, On-Premises Network Trafiğini ve Internet'e giden trafik içindir. Bunları biraz daha özetlemek gerekirse aşağıdaki maddeleri şu şekilde açabiliriz.
Aynı Subnet içerisinde bulunan Sanal Sunucular Farklı Subnet içerisinde bulunan Sanal Sunucular Sanal sunucu üzerinden internete akan trafik VNet to VNet VPN kullanılarak Sanal Sunucu üzerinden akan trafik VPN Gateway üzerinden geçen Site to Site veya ExpressRoute iletişimi
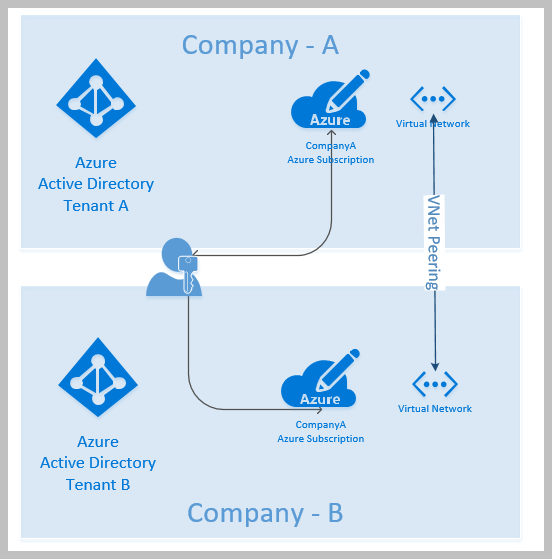
Örneğin aşağıdaki bu sanal ağı iki alt ağ ile düşünün. Bunlar gördüldüğü üzere Front-End ve Back-end olarak çağrılmaktadır. Bu yüzden bunların tamamıyla yönetimi System Route ( Default Routes) tarafından yönetilmektedir.
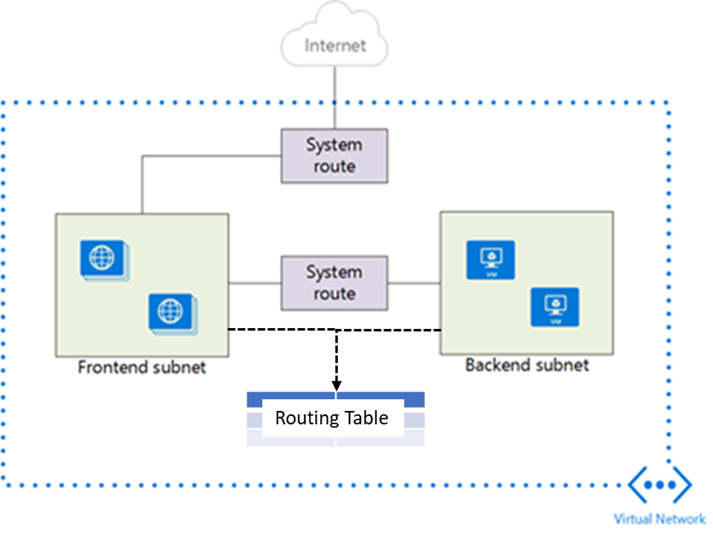
Yukarıdaki senaryoyu biraz açmak gerekir ise, Sistem Routes hakkındaki bilgiler Route tablosuna kaydedilir. Route tablosu, paketlerin sanal bir ağda nasıl yönlendirilmesi gerektiğini belirten bir dizi yönlendirme kurallarından oluşmaktadır. Bunun dışında yine bildiğiniz üzere, Azure içerisinde herhagi bir Virtual Machine veya PaaS bir hizmetin belirli bir Next Generation Firewall ( Network Virtual Appliance ) üzerinden geçmesini istiyorsanız, User Defined Route tablolarını kullanmanız gerekmektedir. Bu Route tabloları subnet ile ilişkilendirilir ve subnet içerisinden ayrılan her paket, ilişkili route tablosuna temel alarak veya dayanarak işlenir. Paketler, hedefi kullanarak Route Tabloları eşleştirerek yön verilir. Gönderilen paket bir IP Adresi Aralığı belirtilerek gönderilen paket Virtual Network, Virtual Network Gateway, Virtual Appliance veya Internet olabilir. Eşleşen bir rota bulunamazsa, paket bırakılır.
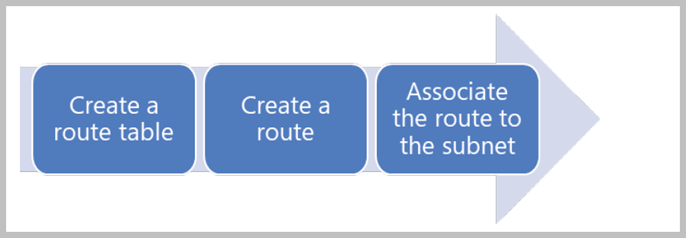
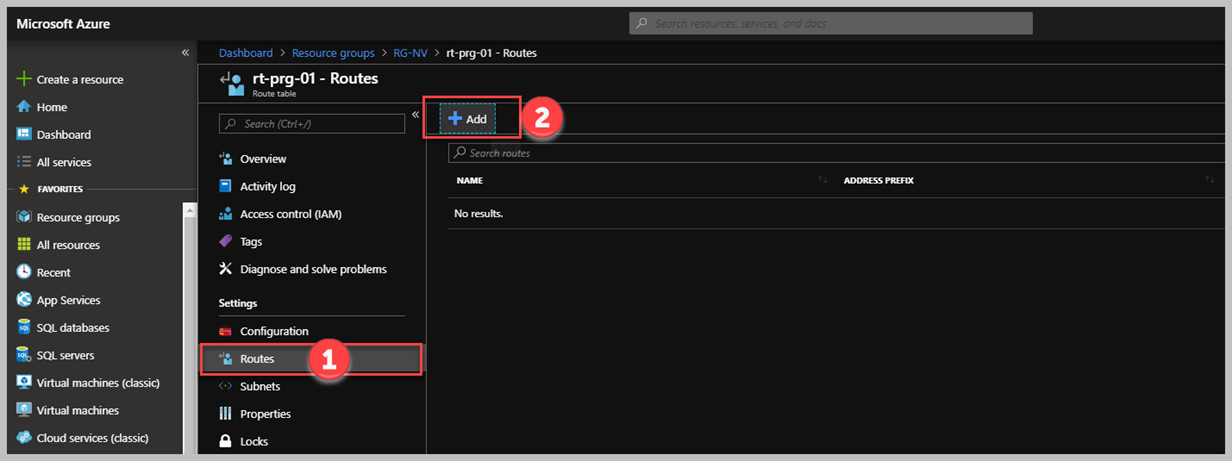
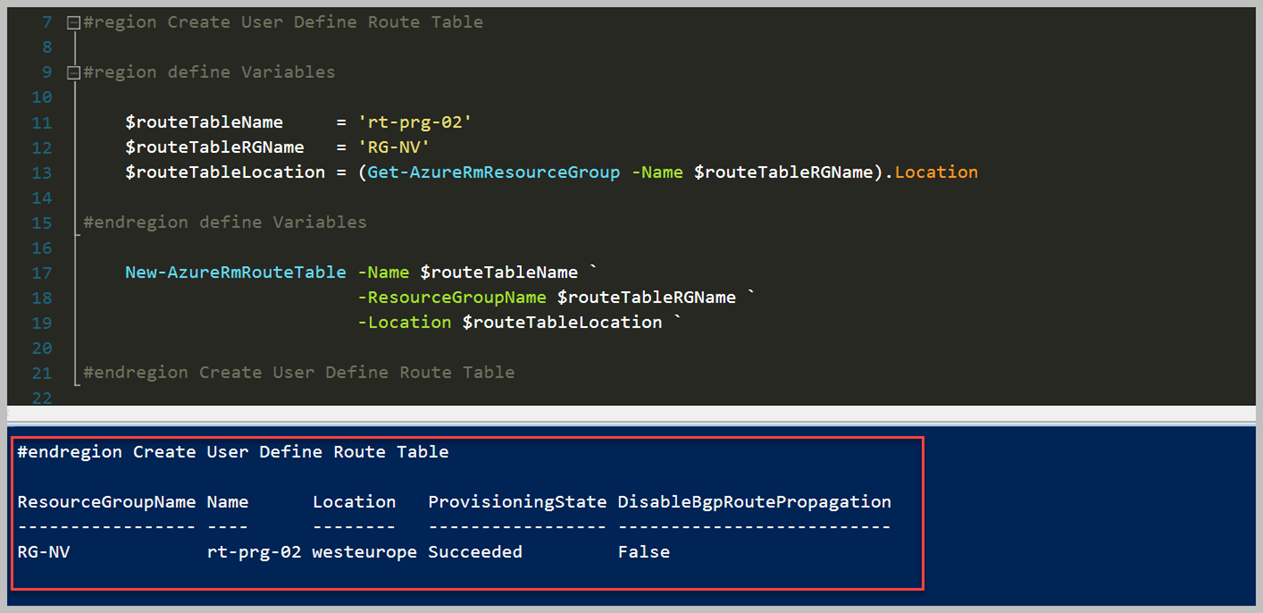
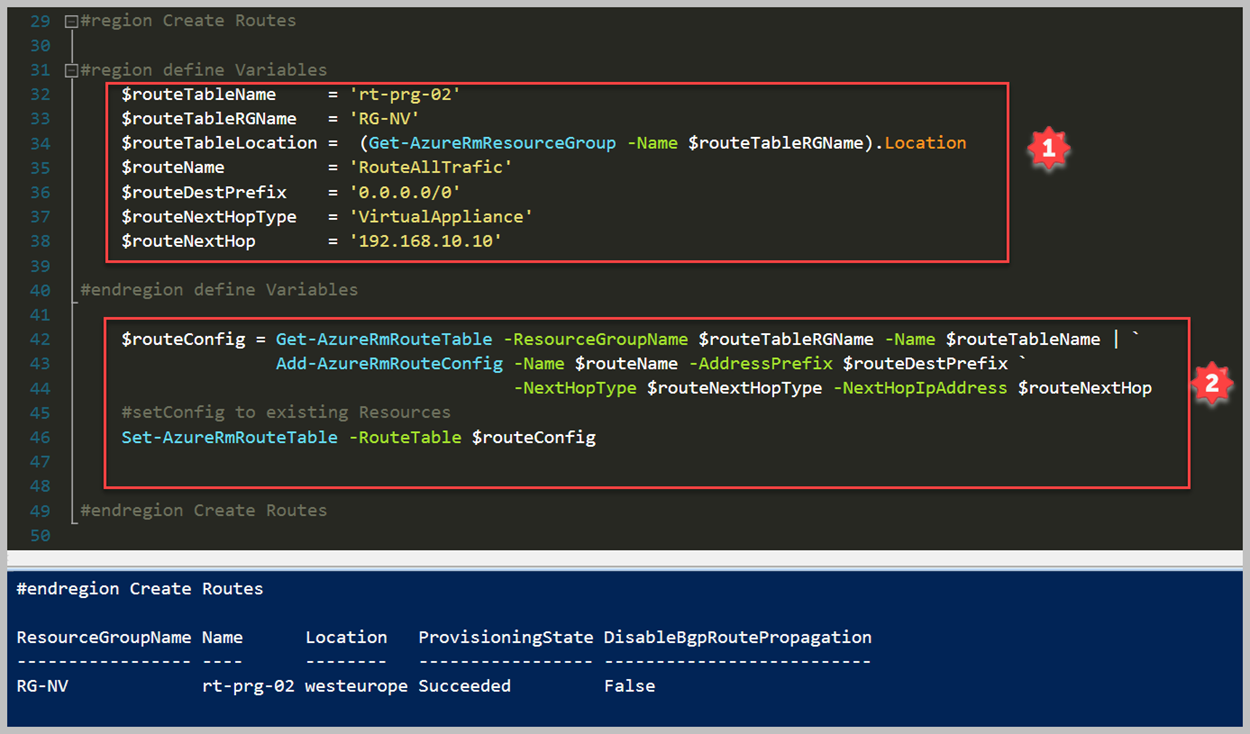
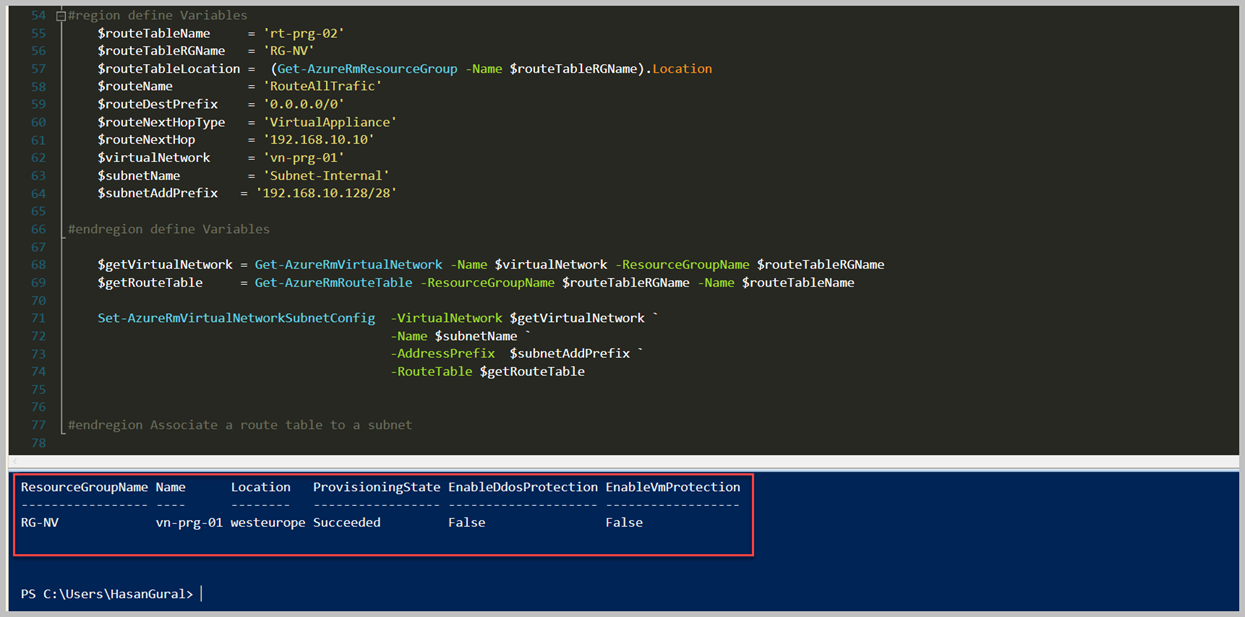
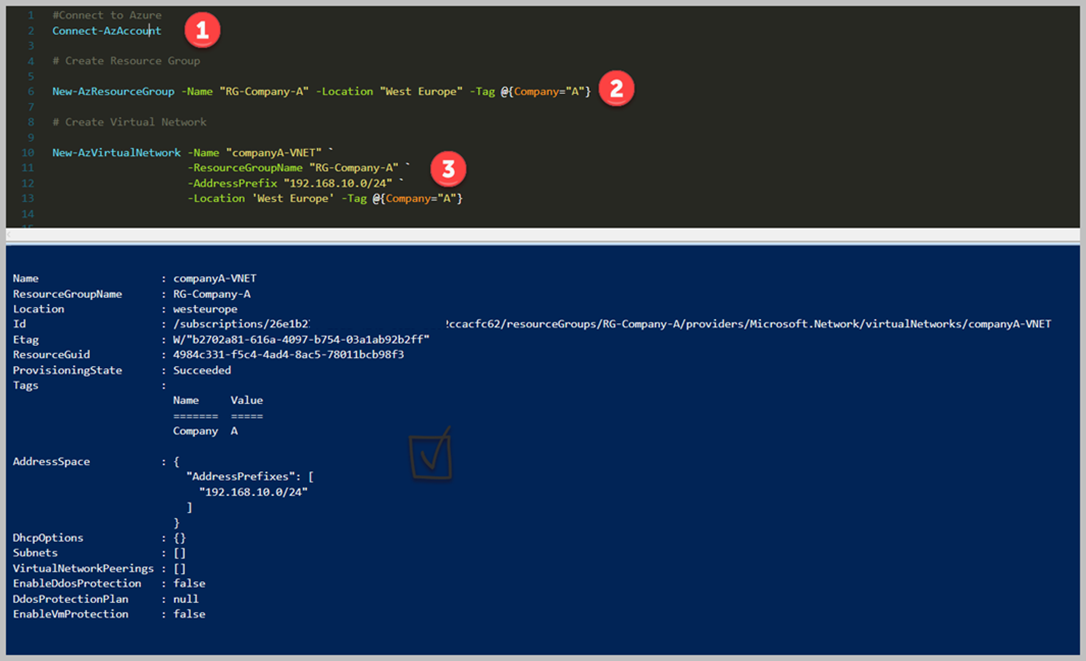
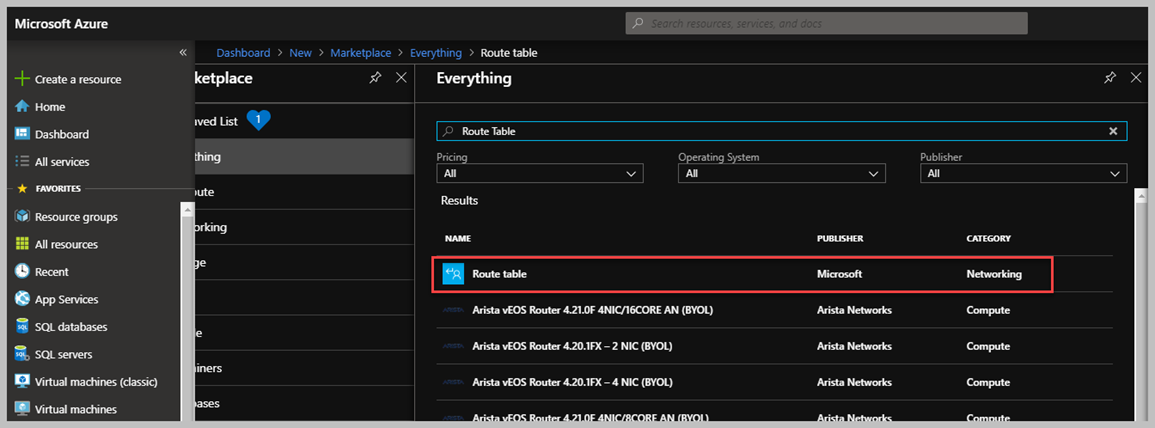
Şimdi süreci tekrar gözden geçirelim. Nasıl bir akış içerisinde Route Table tanımlamaları yapılmaktadır. Önce bir Route Table oluşturmalısınız, daha sonra oluşturduğunuz Route Table içerisine tanımlamak istediğiniz 'Routes' (yönlendirme tablolarının) detaylarını girmeniz gerekmektedir. Bu Route Tabloları, belirttiğiniz bir Adress Aralığı için olmalıdır. Örneğin; '192.168.10.0/24' Network üzerine bir trafik gider ise bunu Virtual Appliance yönlendir şeklinde tanımlamalar yapabilirsiniz. Daha farklı yapmak isterseniz, bütün trafiği yine yönlendirmek için '0.0.0.0/0' olarak girilebilir. Azure Portal içerisinden adımları beraber inceleyelim. Portal üzerinde oturum açalım ve 'Route Table' yazarak ilk Route Tablomuzu oluşturalım.
Route Table üzerine tıkladımtan sonra bizlere hangi Resource Group içerisinde oluşturmak istediğinizi ve Region gibi bilgileri soruyor olacak. Bu kısımda dolduracağınız bilgiler tamamen sizin takip ettiğiniz naming convention yapısına bağlıdır.
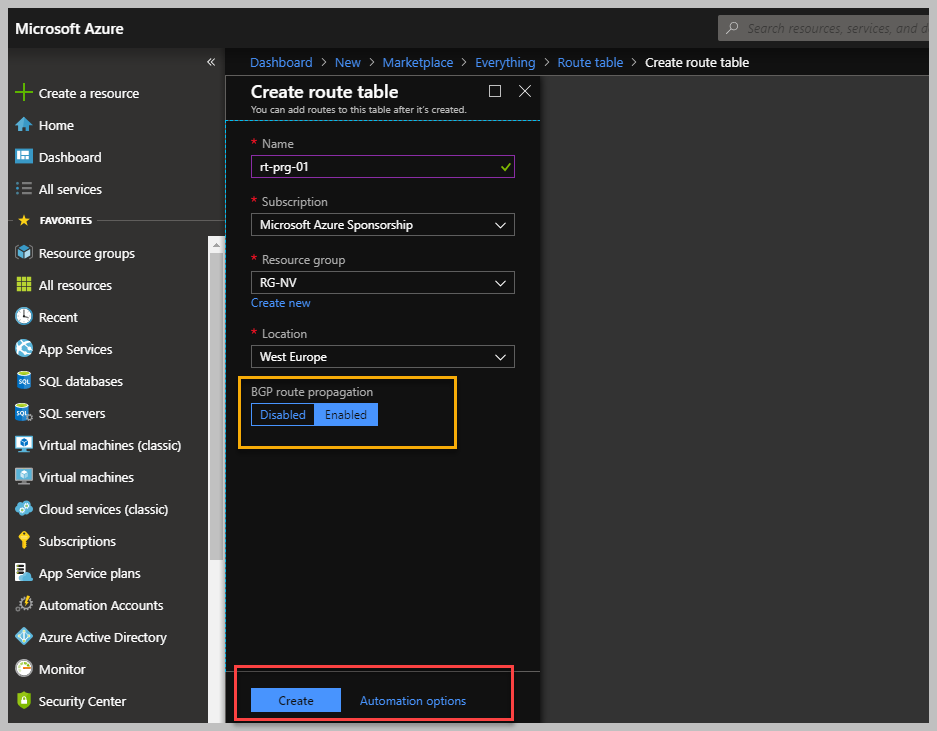
Create Route Table ekranında karşımıza çıkan alanda BGP Route Propagation kısmı var, bu kısım defauly olarak Enabled olarak gelmektedir. Ama bunun ne tür bir işe yaradığını merak ediyorsanız, en temel hali ile Autonomous System mantığına göre çalışan bir protokoldur. Autonomous System Number aralığı 1 – 65535 e kadar gitmektedir. Bu numaralardan bazıları Azure tarafından defualt olarak kullanılmaktadır. BGP Number temel olarak VPN Gateway üzerinden Active-Active senaryolarında, Express Route kullanıyorsanız ortamınızda BGP de bir hedef networke giderken atlayacağı Autonomous System sayısına inceleyerek ve en verimli olan Autonomous System sayısını kullanarak hedef networke erişmeye çalışacaktır.
Artık Route Table oluşturduğunuz ve içerisine ilk önce bu Route Table hangi subnet tarafından kullanılacak bunun tanımlamasını yapalım.
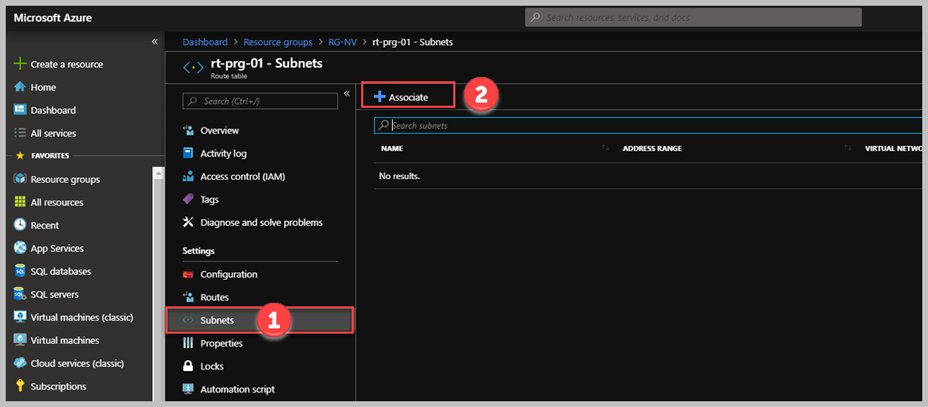
'Associate' butonuna basarak üzerinde olduğunuz Route Table istediğiniz Virtual Network içerisindeki Subnet bağlayabilirsiniz. Tekrar hatırlatalım, Route Table birden fazla subnet atanabilirler, fakat sadece subnet seviyesinde atama yapabilirsiniz. Bu yüzden bu detaya çok dikkat etmelisiniz, örneğin o subnette birden fazla workload veya başka servisleriniz varsa bu route tablo içerisindeki kurallardan etkilenecektir.
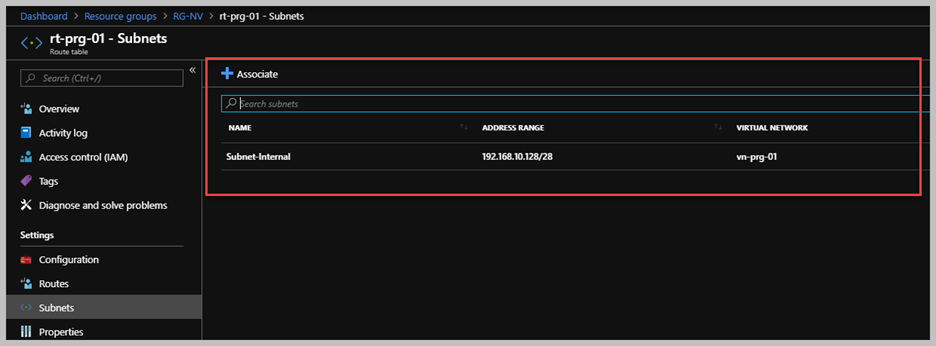
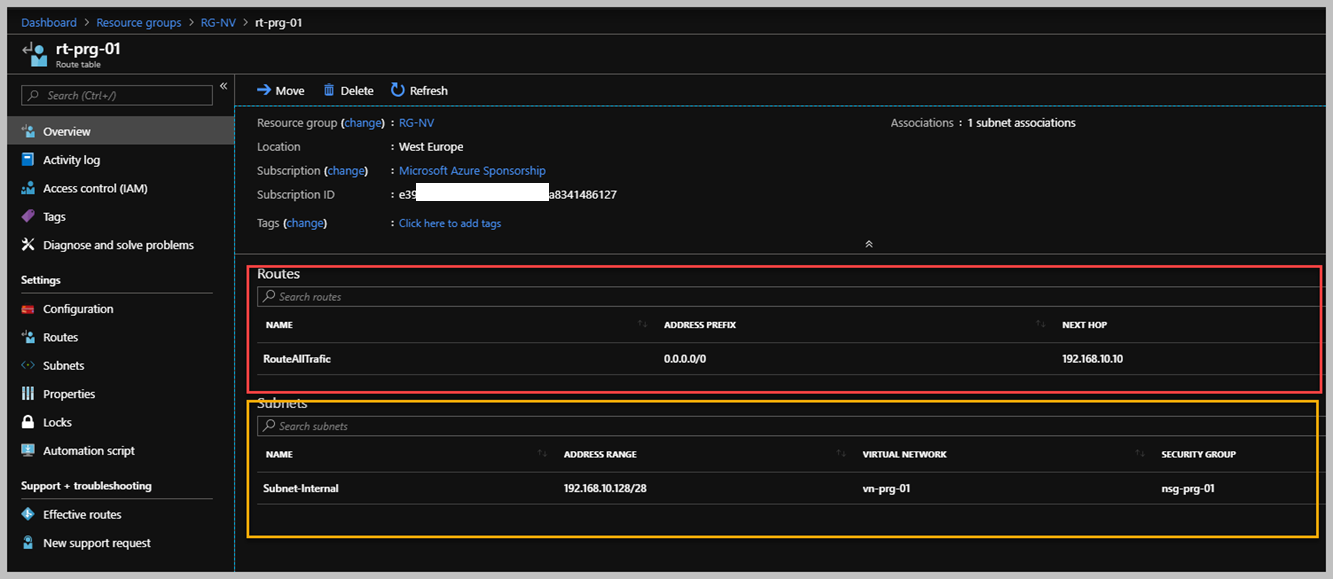
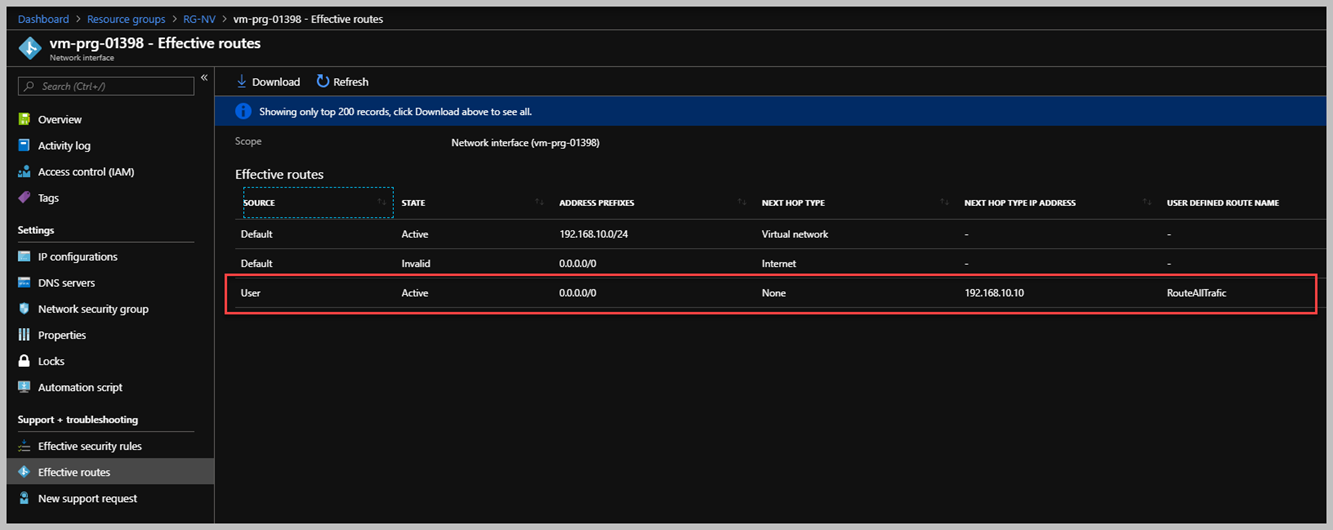
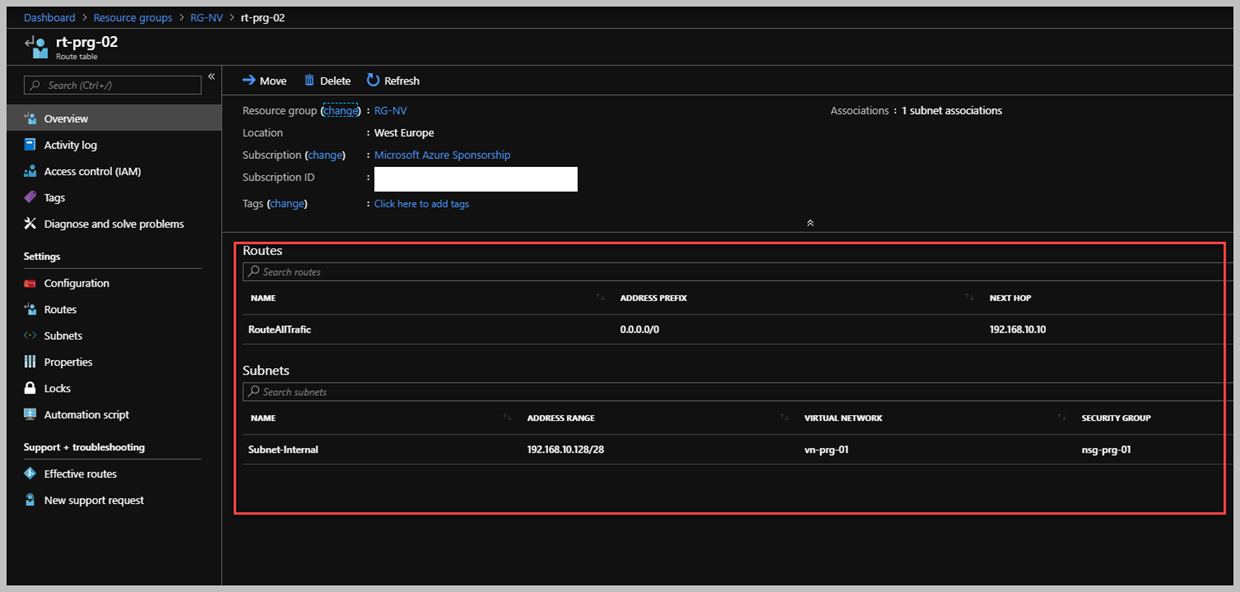
Yukarıda görebileceğiniz üzere Subnet sekmesinde 'Subnet-Internal' isimli Virtual Network içerisinde bulanan Subnet tanımlamasını yaptım. Bundan sonra oluşturacağım tüm Route tabloları için bu 'Subnet-Internal' etkileniyor olacak. Şimdi ise örnek bir route oluşturalım bakalım nasıl gözüküyor olacak. Bu kısma geçmeden önce birkaç detay aktarmak istiyorum. Senaryo gereği, Azure üzerinde bulunan Virtual Network Address Space detaylarımız, '192.168.10.0/24' olarak tanımladım ve istediğim şekilde farklı subnetlere böldüm. Bu kısımdaki tasarım size ait bir konu, bunun dışında yazımızın başında Virtual Network içerisinde bulunan subnetler kendi aralarında native olarak konuşurlar. Bizim yapmak istediğimiz bu örnek üzerinde, 'Subnet-Internal' içerisinden herhangi bir Adress aralığına örneğin, '0.0.0.0/0' bu CIDR notasyonu tüm trafik için belirleyeceğiniz Next Hop tipine göre değişebilir. Şimdi gelin beraber hangi tür tipler karşımıza çıkmaktadır bunlara bakalım.
Virtual appliance: Azure üzerinde konumlandırdığınız ve aynı network içerisinde olan Network Virtual Appliance veya Azure Firewall olabilir. Eğer herhangi bir Next Generation Firewall ( Network Virtual Appliance ) konumlandırması yaptıysanız, ilgili cihazın Network Interface özelliklerinde 'IP Forward' özelliğini açık olduğuna emin olunuz. Temel olarak göstereceğiniz IP Adresi olacak ve Network Virtual Appliance cihazının internal ip adresi olmalıdır. Bu tasarıma göre Azure Internal Load Balancer olabilir.
Virtual Network Gateway: İhtiyacınız göre belirlediğiniz network aralığının Azure Virtual Network Gateway gitmesini yönlendirebilirsiniz. Bu kısımda dikkatli olunması gereken nokta, eğer virtual network gateway VPN – Route Based tipinde ise bunu yapabiliyorsunuz fakat Express Route kullanıyorsanız BGP devreye giriyor ve Route Tabloları işlemiyor.
None:İhtiyacınız göre belirlediğiniz network aralığının Virtual Network içerisinde durdurulmasını sağlayabilirsiniz.
Virtual Network: Bu bölüm odukça önemli aslında biraz Subneting detaylarına kadar gidiyor ama en basit hali ile Virtual Network içerisindeki varsayılan yönlendirmeyi ne zaman geçersiz kılmak istediğinizi belirtin. Bazı durumlardan Network içerisinden tüm paketleri çıkarmak istersen kendi Network içerisinde dönmesi gereken paketleri bırakabilirsiniz. Örneğin yukarıda '0.0.0.0' detayında route örneğinde herşeyin Virtual Appliance üzerine gitmesi tercih etmeyebilirsiniz. ( Kendi Network aralığınız olsa bile, işte bu yüzden Virtual Network tanımı yaparak network içerisinde kalsın deme hakkında sahipsiniz.)
Internet: Tahmin edebileceğiniz gibi istediğiniz adres aralığı için Azure tarafından size sunulan gateway sayesinde internete kavuşabilirsiniz. Bir sonraki yazımıda birkaç route oluşturma örneği portal üzerinden ve Powershell ile gerçekleştireceğiz.